How to Reprogram a Chamberlain Garage Door Opener
Reprogramming a garage door opener is crucial when you move into a new house, lose you remote or lose your code. It is also necessary after sharing your code with outsiders.
Keep reading to learn how to reprogram a Chamberlain garage door opener.
How to Reprogram a Chamberlain Garage Door Opener
The key difference between programming a reprogramming a garage door opener is the reset of settings and code. And the erasing of the memory. Follow the steps below to reprogram a Chamberlain garage door opener.
Step 1. Erase the Door Opener’s Memory
First, you must reset the door opener by deleting all previous programming codes:
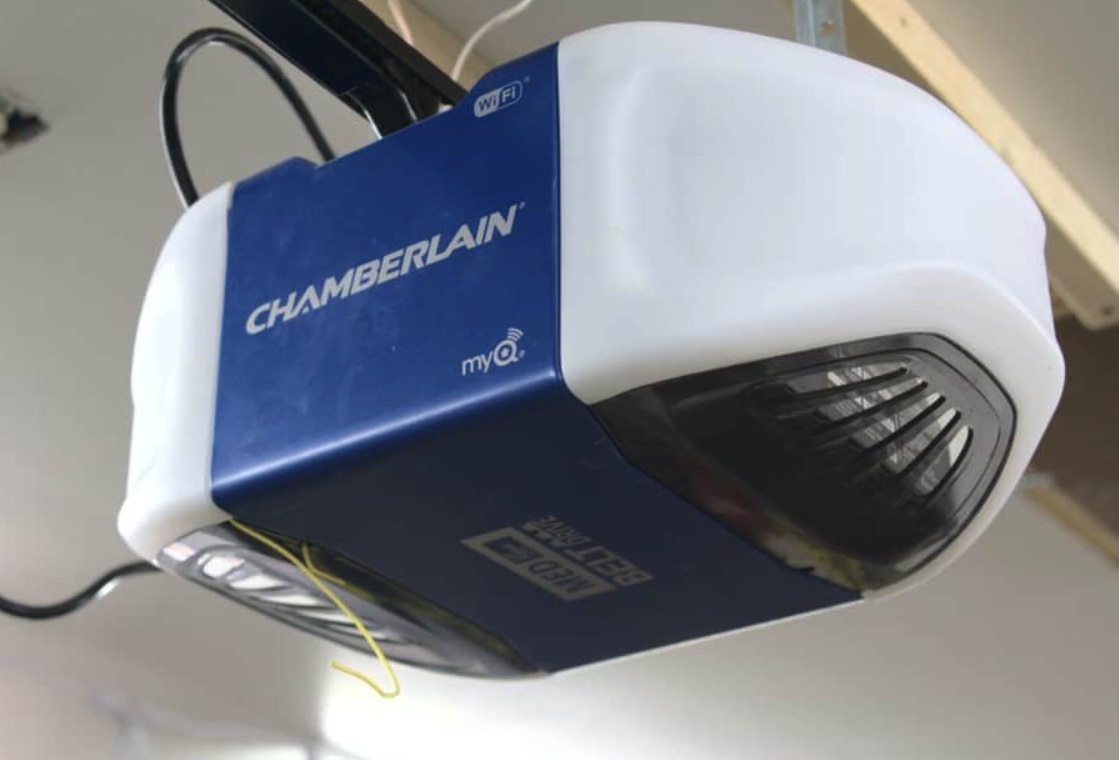
- Look for the LEARN button at the back of the motor housing
- Hold the button for six seconds until the LED light beside it goes out
- Reset the garage door opener and erase all the existing programming
- Check if you’re successful by opening the garage door using the remote.
Step 2. Reconnect the Remote Control
Next, you need to program the remote control following the exact steps for your particular model. If you forgot the model of your garage door opener, simply look at the color of the LEARN button. The color corresponds to the number of times you need to press the button.
| Color of LEARN Button | No. of Presses | Garage Door Opener Model |
| Yellow | 1 | Security+ 2.0 |
| Purple | 2 | 315 MHz Security+ |
| Red/Orange | 3 | 390 MHz Security+ |
| Green | 4 | 390 MHz Billion Code |
Note: You only have 30 seconds to reprogram your remote control. So ensure everything is ready and you are familiar with the steps.
On your remote control, look for a metal chip inside a hole. This can be found on the side or the back behind a vizor. Hold this button using a straight and sturdy wire because it’s not easy to press to prevent you from accidentally reprogramming your door opener. A paper clip can be an ideal item to use.
Press this button until the light comes on. When it does, you have 30 seconds to complete the reprogramming steps. Press and release the LEARN button on the garage door opener. Then, press the desired button on the remote corresponding to the number of presses for the color of your LEARN button.
You’d know that everything is successful if the LED bulb blinks. To check, go to your garage door and use the remote to open it.
Step 3. Reprogram the Keypad
To reprogram the keypad:
- Press the LEARN button on the motor housing. Once the LED light turns on, you have 30 seconds to complete the process.
- Enter the 4-digit code and press ENTER until you hear a click.
- Check if the light bulb flashes.
- Press ENTER on the keypad and wait for the garage door to close. Press the 4-digit code and check if the door opens.
How to Program a Chamberlain Garage Door Opener Directly with the Remote Control
The Chamberlain remote control is a great way to open and close your garage door with one simple press of a button. Programming it will allow you to access keyless entries, and here are the steps to take in order to do so, using only your garage door opener:
Step 1: Locate the “Learn” Button on the Garage Door Opener
On the opener motor that hangs from the ceiling of your garage, locate a “Learn” button. As we mentioned before, if you cannot find it, look just above the antenna wire (don’t forget – it could be under the garage door opener’s light cover).
Step 2: Determine the Garage Door Opener’s Radio Frequency
You can determine the remote control’s radio frequency (in MHz) by looking at the LED light’s color, located right beside the “Learn” button, and then by looking up that light and corresponding frequency in the owner’s manual. In case you missed them, earlier we listed many of the possible radio frequencies (known here as the garage door’s ID number).
Once you have determined that your garage door opener and remote control’s frequencies are compatible, you may need to clear your garage door opener’s memory (such as, if you recently purchased the house and you want to change to a new remote control).
Step 3: Program Your Remote Control to Your Garage Door Opener
Now you must press the “Learn” button on the garage door opener. Follow this step with pressing one of the remote-control buttons. When the garage door opener light bulbs flash or you hear a couple of clicks, then you know your remote control is programmed.
As always, test your remote control to make sure the process worked.
Key Points to Remember When Programming Your Chamberlain Garage Door Opener
When programming your Chamberlain remote control or keypad, it’s important to keep the following tips in mind:
Check Serial Numbers
If you are confused about what kind of Chamberlain garage door opener you have, be sure to check for any sticker with the serial numbers of your remote control or keypad. This will help you determine the model type.
Check Compatibility
Be mindful that not all remote controls and keypads are compatible with one another. So make sure to double-check the remote control and keypad frequencies as listed in your owner’s manual.
Check the Manual
Follow the instructions manual for your particular model of garage door. This process varies slightly depending on the model of remote control, so it’s essential that you have a manual handy and follow its instructions.
Check the MyQ App
If you’d like even more control over your Chamberlain garage door opener, consider integrating it with the MyQ app. This way, you can access and manage your remote control or keypad from anywhere in the world using your smartphone. The app also allows for remote monitoring of your garage door opener to ensure that it is operating safely and securely.
How To Program Chamberlain Garage Door Opener Keypad
Follow the steps below;
Press the “Learn” button on the garage door opener
Learn buttons come in different colors. Note this as the color will play a part on programming your keypad
With the aid of a stepladder, open the light cover, and press the learn button located on the side or back of your garage door opener.
Now you have 30 seconds to complete the programming.
Once the learn button has been pressed the LED light will turn on. At this point you have 30 seconds to go out to the keypad.
Note: Do not hold the learn button down or you will clear all remote controls from the memory of your garage door opener.
On the keypad enter any four-digit code. Do not to repeat a number like “4444” as this could shorten the useful life of your keypad from the “4” key being pressed so many times.
The number of times that you will need to press the enter button will change depending on the color of the learn button.
- If the learn button is yellow press the enter button once.
- If the learn button is purple press the enter button twice.
- If the learn button is red or orange press the enter button three times.
- If the learn button is green, press the enter button four times.
Note: If the code is not entered within those 30 seconds, the keypad will not work and you will need to start again.
How to Reprogram Chamberlain Garage Door Keypad
Here are the steps of how to change garage door code without the old code:
- Locate the LEARN button on the garage door opener.
- Press and hold the LEARN button on the door control until the LED turns off (approximately 6 seconds).
- All previous codes are now erased. Reprogram each remote control and keypad you wish to use
- Then Reprogram Chamberlain Garage Door Keypad as follows:
- This Procedure is for MODELS 940EV, 940EV-P2, 940EVC AND 940EVC-P2
- Press and hold the * and # buttons until the lights on the keypad stop blinking.
- Enter a 4-digit personal identification number (PIN) of your choice, then press the # button.
- Press and release the ENTER button on the Keyless Entry the number of times that corresponds with your garage door opener type:
- Press and release the 0 buttons.
- Press and release the Learn button on the garage door opener. The Learn LED will light. Within 30 seconds…
- Enter your 4-digit PIN, then press and release the ENTER button until the garage door opener lights flash or two clicks are heard.
- To test, enter your PIN, then press the ENTER button. The garage door opener will activate.
How to Program a Keypad PIN
The two options to program a 4-digit Personal Identification Number (PIN) include using a door control with a LEARN button or using a garage door opener with a LEARN button.
To program a Keypad PIN Using Your Door Control;
- Ensure to clear the garage door area of any obstructions.
- Locate the LEARN button on the door control.
- Press the LEARN button twice. The LED will flash.
- Enter a 4-digit PIN of your choice on the keypad, and press ENTER.
- The opener lights will blink, indicating the PIN programming is complete.
- Once your PIN is set, you can change the PIN or set a temporary PIN (Procedure to do that are in a later section).
How to Program the Garage Door Keypad PIN Using Your Garage Door Opener
- Ensure to clear the garage door area of any obstructions.
- Locate the LEARN button on the garage door opener. Press and release the LEARN button. Once the LED is lit, you will have 30 seconds to complete the next step.
- Enter a 4-digit PIN of your choice, then press and hold the ENTER button until the garage door opener light blinks. The PIN programming is complete.
How to Change Code on Chamberlain Garage Door Opener
Here are the basic steps for changing an existing keypad personal identification number (PIN).
- Ensure you clear the garage door area of any obstructions.
- Press the programmed PIN that you want to change.
- Press and hold the # button until the garage door opener light blinks twice.
- Enter the new 4-digit code of your choice, then press the ENTER button. The opener lights will blink once. The PIN programming is complete
How to Add a Temporary PIN
- Enter any programmed PIN, then press and hold the * button until the garage door opener light blinks three times.
- Enter the temporary 4-digit PIN, different than the last one you used, then press the ENTER button. The garage door opener lights will blink four times
- Press the number of hours the temporary PIN will work (up to 255 hours), then press the * button. The garage door opener blinks one time, and the temporary PIN is ready to use.
- Set How Many Times to Open the Garage Door with a Temporary PIN
- Enter any programmed PIN, then press and hold the * button until the garage door opener light blinks three times.
- Enter the temporary 4-digit PIN of your choice, then press the ENTER button. The garage door opener lights will blink four times.
- Press the number of times the temporary PIN will work (up to 255 openings), then press the # button. The garage door opener blinks one time, and the temporary PIN is ready to use.
How to Program the Travel on a LiftMaster Chamberlain Garage Door Opener using MyQ
Make sure your garage door is closed but not disengaged and your trolley is near the garage door.
Find your garage door opener adjustment buttons. Their place may vary depending on your Chamberlain garage door opener model.
Press and hold the black square button until the up arrow begins to flash or you hear a beep > this means your opener can now be set in the open position.
Press and hold the up or down arrows until your garage door is fully open > this is your desired up position.
Press and release the black square button > the garage door opener lights will flash 2 times and the down arrow will start to flash. It means your opener open position is now locked and your door opener is ready to set the close position.
Press and hold the down arrow until your garage door is fully closed.
Press and release the black square button to indicate to your opener that your garage door is in the down position you desire > the garage door opener lights will flash 2 times and the up arrow will start to flash. It means your opener down position is now locked and your door opener is ready to set the force programming mode.
Press and release the up arrow. When the door travels to the programmed-up position, the down arrow will begin to flash.
Press and release the down arrow. The door will travel to the programmed down position. Programming is now complete.
Note: If the garage door opener lights flash 5 times during the steps to Program the Travel on a MyQ Garage Door Opener, the programming has timed out.
If the garage door opener lights flash 10 times during the steps to Program the Travel on a MyQ Garage Door Opener, the safety reversing sensors are misaligned or obstructed.
After aligning or clearing the sensors, do a complete up and down garage door cycle using your remote control. Programming will be complete.
The yellow round button is only used to program your garage door accessories. Never-ever use it for programming your opener travel.
Note: After you do any adjustments on your garage door opener, the safety reversal system must be tested.
Using your remote control, your smartphone or your keypad, close your garage door.
Your garage door must reverse when striking the 2×4.
To Reset Chamberlain Garage Door Opener in seconds you need to press and hold the LEARN button at the back of it. Once the memory is erased you can easily reprogram the remote control and keypad using the same button.
How to Re-Sync the Remote Control to your Chamberlain Garage Door Opener
You can re-pair the remote control using three different methods;
Using your Garage Door Opener
- Locate the LEARN button at the unit’s backside.
- Press and let go of the button.
- The LED near the button will slowly start glowing.
- In 30 seconds, press the LEARN button on the remote control.
- Either the lights of the garage door opener will Blink or you will hear two beeps.
Using your Door Control
- Locate the LEARN button at the door control’s back.
- Press the LEARN button two times. The LED will start blinking.
- Press the button once more.
- Either the lights of the garage door opener will Blink or you will hear two beeps.
Using your Smart Control Panel
- Locate the Navigation buttons.
- Use the navigation buttons to access PROGRAM.
- Then choose REMOTE from the program menu.
- Press the ENTER button.
- Either the lights of the garage door opener will Blink or you will hear two beeps.
How to Set Up your Chamberlain Keypad
You can set up your Chamberlain Keypad using the steps below. This allows you keyless entry into the garage.
You just need to put in the 4-digit Personal Identification Number (PIN).
During this process make sure the door is clear of any blockage. You can set up the Chamberlain keypad in 2 ways:
Using Your Garage Door Opener
- Locate the LEARN button at the unit’s backside.
- Press and let go of the button.
- The LED near the button will slowly start glowing.
- In 30 seconds, Enter a unique 4-digit PIN.
- Press the ENTER button and keep it like that until the light starts blinking.
Using Your Door Control
- Locate the LEARN button at the door control’s back.
- Press the LEARN button two times. The LED will start blinking.
- Set a unique 4-digit PIN on your keypad, and press ENTER.
- The opener lights will start flashing. This will complete the process.
- Note: Ensure the door is clear of any blockage during the re-pairing process.
How to Connect the Chamberlain Garage Door Opener to Wi-Fi
If you want to get access to the Chamberlain Garage Door Opener remotely, you need to connect it to the home Wi-Fi. Follow these steps:
- Find and Install the MyQ app from the Application Store.
- Sign Up or Login with your ID and password.
- Press the “+” option on the right corner.
- Click on the “Garage Door Opener with Wi-Fi Ceiling Installed” option.
- Thoroughly go through the prompts and then select Next.
- Press the LEARN button on the garage door opener thrice to activate Wi-Fi mode. There will be a beep and the LED will flash.
- Go to your Phone Settings.
- Open the Wi-Fi menu and select the network with ‘myQ-XXX’.
- Open the myQ app and choose the Wi-Fi network in your home.
- Enter the Wi-Fi password.
- Click on Next. After this, it is now connected to Wi-Fi.
- Provide a name to your garage door opener and Choose Next.
- Click on Finish and the garage door opener will be in your app.
How to Erase Wi-Fi Settings on your Chamberlain Garage Door Opener
You need to erase the Wi-Fi settings on the garage door opener if your Chamberlain device is having issues with the Wi-Fi connectivity.
Follow the given instructions to erase the settings:
- Find the rectangle adjustment button in the middle of two arrow buttons at the unit’s backside.
- Press the button and keep it like that until there are 3 beeps.
- Keep holding the button for 6-7 seconds until the down arrow button starts blinking. There will be 3 beeps again.
- Within a few seconds, the LED light would go off signaling Wi-Fi settings deletion.
How to Change Frequency on your Chamberlain Garage Door Opener
All the devices connected to Chamberlain Garage Door Opener use radio frequencies to work. You can adjust the frequency of its receiver and the remote.
With new updates, manufacturers change the frequencies which the Garage door opener uses. So you also need to change the frequency depending on the model’s age.
To change the frequency;
For Dip switch models
- Use a screwdriver to remove the opener’s light cover.
- Find the antennae wire attached to the receiver containing the dip switch.
- Detach the receiver cover to uncover the dip switch.
- Unlock the battery compartment cover.
- Adjust the receiver dip switch using a screwdriver.
- Adjust the remote dip switch to the same configuration.
For Learn button models
- Locate the Learn button at the unit’s back and press it.
- The LED light will start blinking. It will blink for 30 seconds.
- In those 30 seconds, press the open/close button.
- Press the remote-control button, and the frequency will be changed.
How to Program a Chamberlain Remote Control with the Door Control
Press the “Learn” button on your door control, if it has one. Not all door controls (the device on your wall you can use to open your door) will have learn functions, but yours may. If your door control has a plastic cover that’s able to be lifted off, it may be located right underneath it. Press this button once to access the door control’s pairing mode.
If your door control looks more like a doorbell, you may be able to access the “Learn” function by holding the light button on the side of the device while pressing and releasing the front button.
If you have a smart door control, you can activate pairing mode through its menu. Navigate to the program tab of the menu, then select >remote.
Push a programmable button on your remote control. Select and press one of the face buttons on your remote control—it doesn’t matter which one. The garage lights will flash, or you might hear 2 clicks. This tells you that you’ve successfully programmed your remote control.
Some types of remote controls, like the Chamberlain Universal Remote, may need to be put into pairing mode before they can be programmed. If you press the bottom button for 15 seconds, then release it, the remote will be in pairing mode for 60 seconds.
Use your remote control to test out your garage door opener. If the garage door opens, the device has been successfully programmed. If not, you may have objects near the door obstructing it. If this isn’t the problem, you may have to try programming the remote control with the garage door opener (the box attached to your ceiling).
How to Program a Chamberlain Remote Control with the Garage Door Opener
Find the “Learn” button on your garage door opener. The “Learn” button is how you’ll be programming your remote. It’s located above the antenna wire that hangs from the garage door opener’s motorhead (the garage door opener is located on your ceiling). It may be covered by a light cover, which you’ll need to remove to access it. Next to the “Learn” button is a small LED light, which is used to check the compatibility of the opener with remote controls.
Check the LED light inside the opener for compatibility. The color of the LED light lets you know if your remote is compatible. The LED light next to the learn button tells you which radio frequency the garage door opener uses. You can see what kinds of openers your remote is capable of working with by checking its manual.
Garage door openers come with a few different colors for their “Learn” buttons—red, yellow, green, and purple. Keep in mind that over time, red buttons can look orange, and purple buttons may appear brown.
While current Chamberlain garage door remotes are compatible with nearly all doors produced after 1993, some older remotes may have more limited compatibility.
If your garage door opener isn’t compatible with your remote, you may want to purchase a newer model.
Clear your garage door opener’s memory (optional). If your door was previously programmed, clear its memory. Have your garage door opener forget its previous connections by holding the “Learn” button for about 6 seconds. The LED light for the “Learn” button should turn off, at which point you’ll know that your garage door’s previous connections have been cleared.
Push the learn button on your garage door opener. Switch on the programming mode of your garage door opener. This just takes a simple button push—press the learn button on your garage door opener, then immediately release it. Your garage door opener can now be to be paired with a remote control.
Press a programmable button on your remote control. After pressing the learn button, you have 30 seconds to program the remote. Push one of the face buttons on your remote control—it doesn’t matter which one. The garage lights should flash, or you may hear 2 clicks. This lets you know that you’ve successfully programmed the remote control.
Some types of remote controls, like the Chamberlain Universal Remote, may need to be put into pairing mode before they can be programmed. If you press the bottom button for 15 seconds, then release it, the remote will be in pairing mode for 60 seconds.
Test out your garage door opener. Push the programmed button on your remote again to test the connection. If your garage door opens, you’ve successfully programmed your remote. If not, you may have to do some troubleshooting. Try some of the following steps:
Make sure that the area around the garage door is clear.
Check your manual once again to make sure that your opener is compatible with your garage door.
Redo the programming process.
If nothing else works, get in contact with Chamberlain customer service.
How to Program a Chamberlain Garage Door Opener with the Keypad
The Chamberlain keypad is another device that you can use to open and close your garage door, and this one works without having to use a remote control. You will need to install the keypad if you have not already done so, which goes outside of the garage and is powered by a 9-volt battery.
Once you have installed wireless keyless entry keypad, you can start setting it up. Here are the steps you will need to take to program it:
Step 1: Locate the “Learn” Button on the Garage Door Opener
In this method, you will still want to locate a “Learn” button. However, this time you will simply locate the button on the garage door opener itself – the opener motor that hangs on the ceiling of your garage. If you are having difficulty finding the “Learn” button, it should be just above the antenna wire, and it possibly might be under the light cover (which, in that case, you will have to pull off before finding the button).
Step 2: Locate the LED Light Beside the “Learn” Button
Once you have located the “Learn” button, you will also want to locate the LED light beside it. An interesting feature here is that the color of the LED light lens will indicate to you what type of garage door opener ID you have (which will help you program it easier). You will need this ID number in order to program your garage door opener.
Be sure to double check your manual, but the LED light colors usually correspond with the following IDs:
- Red or orange light’s ID: 2
- Purple light’s ID: 3
- Green light’s ID: 4
- Yellow light’s ID: 8
Step 3: Get Your Keypad Ready to Program
Go back to your keyless entry keypad. Press the two outside bottom buttons: the asterisk (*) and the pound sign (#). No need to press them a number of times – simply hold them down until your keypad lights stop flashing. Then you can enter your garage door’s 4-digit PIN number.
Once you have entered the numbers in, you will need to also enter your garage door’s ID number (see previous step).
Step 4: Pair the Keypad to the Garage Door Opener
Go back to the garage door opener and press the “Learn” button one time. Return to the keypad and type in your 4-digit personal identification number, followed by the number “0.” Once this happens, you have successfully programmed your garage door opener, pairing it with your keypad.
Step 5: Test Your Keypad
You can now test your keypad – enter the PIN you programmed it with and then press enter (if applicable). If done correctly, the keypad should send a signal to the garage opener and cause it to open or close accordingly.
If this does not work, try programming again and make sure all of your connections are secure. You may also want to consult your remote-control manual for more detailed instructions.
How to Program a Chamberlain Garage Door Opener with the Door Control
Both the garage door control and the garage door remote control devices often come in handy and are designed to make life a whole lot easier as you come and go from your home. However, you need to know how to program them so that you can actually use them! Let’s dive into how to program your Chamberlain garage door opener using the door control and remote control.
Step 1: Locate the “Learn” Button
You need to find the ‘Learn’ button, if your door control has one. This can usually be found on the front of your door control, sometimes underneath a plastic panel that you can lift.
Step 2: Press the ‘Learn’ Button
Once you have located the learn button, press it. This will activate the programming mode (called the pairing mode) of your door control.
Step 3: Activate your Garage Door Remote Control
Now it’s time to activate your remote control. To do this, press and hold any one of the remote control’s transmitter buttons for roughly two or three seconds. You might see an indicator light flash a few times or you might hear a couple of clicks.
If you are having trouble finding the transmitter buttons, they are simply the little buttons on the front of the remote control. The remote control is actually a small little radio transmitter, and it sends and receives radio frequency waves to and from the garage door.
Step 4: Test the Garage Door Opener
Once you have followed the instructions above, it’s time to test your remote control by pressing it again. This will usually cause the garage door opener lights to flash, and then your garage door should open or close accordingly.
If this doesn’t happen, try programming again and make sure everything is connected correctly. If all else fails, consult your remote control’s manual for more detailed instructions.
How to Reset the Chamberlain Garage Door Opener
Reset your Chamberlain garage door opener by pressing and holding the LEARN button on your motor housing for 6 seconds, until the LED light goes out. When the LED goes out, all remote control and keyless entry codes will be erased. To confirm, try using your remote. It shouldn’t work.
1. Erase the memory of your Chamberlain garage door opener
The first step to deleting previous programming codes and resetting your Chamberlain garage door opener is to locate the LEARN button. This button is located up at the back of the motor housing.
Press LEARN button on Chamberlain garage door opener to reset
Many of the latest models have an LED light right next to to the LEARN button as well. Simply press and hold the LEARN button for approximately 6 seconds, until that LED light goes out.
2. Reconnect your remote control
Now that you’ve reset your Chamberlain garage door opener, you’ll want to reconnect your remote control. The exact steps you’ll need to take will depend on the model opener you have and the color of the LEARN button on your opener.
3. Set Up The Keypad
To program your Chamberlain keypad:
- Press the LEARN button on the Chamberlain garage door motor housing
- You’ll see the LED light come on indicating you have 30 seconds to set up the keypad
- Enter your 4-digit code on the keypad then press and hold ENTER until you hear a click and see the light flash on the overhead Chamberlain garage door motor housing
- Now press ENTER and your garage door should close no problem
- After the door closes, enter your 4-digit code and press ENTER. Your garage door should open.
Note: Sometimes the instructions above end up working for a few days but eventually your keypad stops working, and even interferes with other remote controls that you have in your vehicles.
If that happens to you, try setting up your Keypad following these steps:
- Press and hold both the * and # buttons on the keypad until the lights on the keypad light up and then stop blinking.
- Enter a new 4-digit code on the keypad then press the # button.
- Then press the ENTER button the number of times that goes with the color of your LEARN button (use the table I provided you above. For example, if your LEARN button is yellow, press ENTER once)
- Finally Press 0 on the keypad to exit programming mode.
- Now go to your Chamberlain garage door motor housing and press the LEARN button once. The LED on the motor housing will stay lit. You now have 30 seconds for the next step…
- Go back to the keypad and enter your4-digit code again then press and hold the ENTER button on the keypad until the light blinks in your motor housing.
- Test your keypad to make sure it is working properly.
Note 1:
If you’re stuck on any of the steps above you’ll want to reference the manual for your specific Chamberlain garage door opener. If you’re not sure what model opener you have simply go to the motor housing on your Chamberlain garage door open and you’ll find a sticker on the side with your exact model number. Or you can reach out to Chamberlain customer service.
Note 2:
If your Chamberlain garage door opener is malfunctioning or if you’ve lost a remote or it was stolen, you should reset your opener.
Fully resetting your Chamberlain garage door opener requires you to:
- Erase your garage door memory (including all remote control and keyless entry codes)
- Reconnect your remote control(s)
- Set up your key pad
If you find that you’re having trouble with any of these steps you should visit Chamberlain’s website and track down your model’s user manual.
If all else fails, give Chamberlain customer support a call and they will get things sorted out for you.
How to reset the remote control for Chamberlain garage door
Follow these steps to reconnect your Chamberlain remote control:
- Slide off the metal clip from your remote control. This will reveal a small button on the back center of your remote (on newer models that reset button may be located on the front or side of the remote).
- Use the metal clip to press that button.
- You should now see an LED light on the front of your remote control.
- For Newer Models;
- Press and release the LEARN button on the garage door opener. The LEARN LED will light. Within 30 seconds…
- Press and release the remote-control button you want to use
- Check to see if the garage door opener light bulb blinks. If not, wait for the remote control LED to light solid then slowly press and release the remote control button again.
- Repeat until the light bulb blinks. DO NOT press the button after the lightbulb blinks.
For Older Models;
Next, identify what color your LEARN button is on your Chamberlain motor housing. Press and RELEASE the remote button you wish to program the number of times the table above tells you to.
After you’ve pressed the remote button the correct number of times, press a different button on the remote one time. The LED light on the remote should now turn off.
Now, on your Chamberlain motor housing, press and release the LEARN button.
Finally, press the remote button you just programmed once and the light on the opener should flash, press it again and your garage door should open/close.

