How to Use a Nut Splitter
A nut splitter splits a seized nut frozen in place, rusted on, or screwed on too tightly to remove. Which makes it a great last resort tool if you need to remove a stubborn nut from an equally stubborn bolt. When nuts, screws, and bolts rust, they can become stuck to bolt shafts and be extremely difficult to remove.
Keep reading to learn how to pick the best nut splitter tool to deal with stuck nuts.
What is the purpose of a nut splitter?
A nut splitter tool removes damaged or seized nuts from bolts or threaded studs. Nuts can become seized onto the threads of fasteners due to corrosion. This can make removing them difficult, and using a socket or spanner often makes matters worse, as they can slip, rounding off the nut’s corners.
Do nut splitters work?
Yes. While there are several ways you can try to remove a seized or damaged nut, each method will likely result in more damage to the nut, making the job harder. Once other methods of removing a damaged nut have failed, a nut splitter can be the final solution.
Likewise, when other methods have failed, a nut splitter can be the last resort to removing the nut.
Types of nut splitter
Nut splitters can be extremely handy – that much is beyond debate. However, if you don’t know what you’re looking for, buying a nut splitter can be a real headache!
Nut splitters typically come in one of the following forms:
Ring frame nut splitter
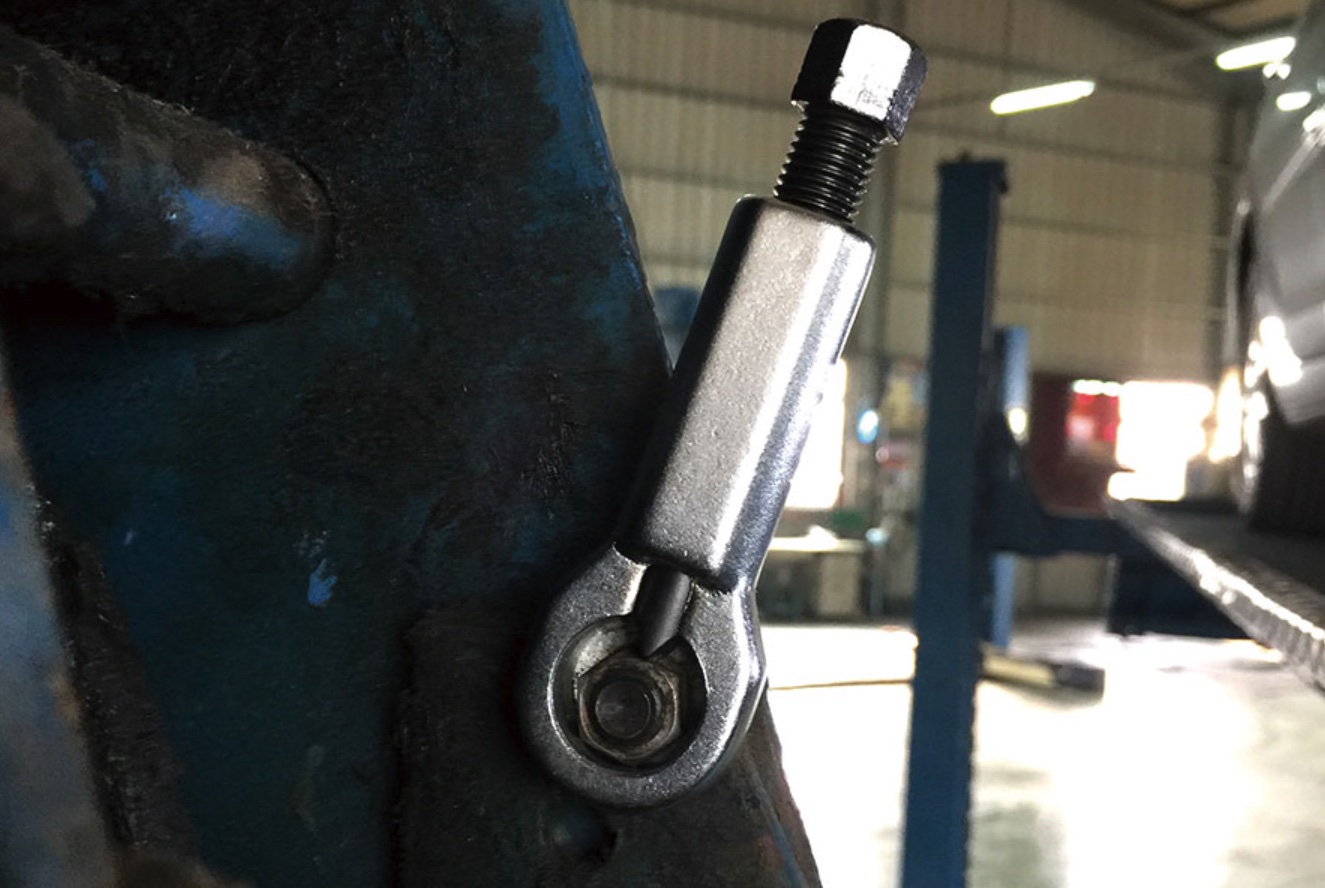
As the name suggests, the frame of a ring-frame nut splitter forms a ring that completely encircles the nut you wish to remove.
Ring-frame nut splitter fully encircling a nut. This nut splitter will often lack a flat anvil opposite the chisel, instead using the inside of the ring frame to pinch the far side of the nut as the chisel is driven into the nut’s flat.
Ring-frame nut splitters are stronger than C-frame ones. This is because as the ring frame fully encircles the nut, it is stronger than a C-frame nut splitter. However, this also makes the frame larger and can sometimes prevent the nut splitter from fitting nuts in confined spaces.
C-frame nut splitter
The C-frame nut splitter looks similar to a G-clamp. However, as one end of the frame is open and it does not fully encircle the nut, it is possible to get a C-frame nut splitter into more confined spaces than a ring-frame one.
C-frame nut splitters are sometimes needed to get access to a nut. This nut splitter design usually comes with a rotating chisel that allows you to use it at various angles, enabling it to access nuts you may not be able to with a ring-frame nut splitter.
The rotating chisel is first adjusted with a hex key, so there will be a minimal gap between the nut and the anvil. Then keeping the chisel square to the nut’s flat, the C-frame nut splitter is positioned over the nut before the screw at the end of the handle is turned to press the anvil up against the opposite flat of the nut. This is continued until the chisel splits the nut.
However, as the C-frame doesn’t completely encircle the nut, it is not as strong as a ring-frame nut splitter. To combat this weaker design, the C-frame is made of thicker material than the ring frames of other nut splitters.
C-frame nut splitter with hydraulic screw action
These are the same as C-frame nut splitters except that instead of the screw acting directly on the chisel, it acts on a hydraulic ram in the handle, which then moves the chisel.
Hydraulic screw action nut splitters cost more than direct screw action ones. Due to their greater internal complexity and increased production costs, C-frame nut splitters with a hydraulic screw action cost more than a nut splitter with a direct screw action.
The hydraulic screw action provides two advantages. Firstly, unlike a regular screw action that acts directly on the chisel, the screw of a nut splitter with a hydraulic screw action does not have to be aligned with the chisel.
Hydraulic screw action nut splitters can transmit the screw force around corners to the chisel. This is because the hydraulic fluid in the ram can transmit the force from the screw around corners or at an angle to the second ram, which then pushes the chisel.
This means the handle of these nut splitters can be angled relative to their frame, allowing you to use them in spaces and situations where a normal screw action nut splitter would not fit.
Hydraulic screw action nut splitters can provide a mechanical advantage. The second advantage of a hydraulic screw action is that it provides a mechanical advantage, multiplying the original force applied to the screw.
Hydraulic nut splitter
Hydraulic nut splitters use a hydraulic ram instead of a screw to drive the chisel into the nut’s flat. This enables them to apply far more force to the chisel than can be achieved with a screw.
Industrial hydraulic nut splitters are capable of splitting very large nuts. The greater force applied to the chisel, along with harder chisel materials, allows hydraulic nut splitters to remove larger and harder nuts than is possible with a screw nut splitter. This type of nut splitter is only found with a ring frame design to cope with the force exerted by the ram.
The hydraulic pumps used with a hydraulic nut splitter include hand-powered, electric, and pneumatically powered. In addition, hydraulic nut splitters are powered by a separate hydraulic pump. This pump can be powered by hand, electricity, pneumatically (compressed air) or petrol.
Industrial hydraulic nut splitters are very costly. Hydraulic nut splitters cost considerably more than a screw action or C-frame with hydraulic screw action nut splitter. This means they are rarely used outside the heavy industry and very specialist applications.
Note: Before purchasing, ensure the splitter can cover the nut. A large nut splitter cannot split small screws and nuts. You’ll also need to make sure the splitter’s design fits.
How do you use a nut splitter?
Follow the steps below to remove stuck nuts using a nut splitter;
For a manual nut splitter:
- Unscrew and push back the chisel until you can fit the nut inside the frame of the nut splitter.
- Turn the screw head of the nut splitter in an anti-clockwise direction and push the chisel back into the handle until you can fit the nut between the chisel and the anvil.
- If the screw is stiff to turn, you will have to use a correspondingly sized spanner or socket to do this.
- The chisel of the nut splitter should line up square and in the center of the nuts flat.
- Place the nut splitter’s frame over the nut, line the anvil, and chisel up with the nut’s flats.
- Ensure the chisel is positioned in the center of the nut’s flat and square.
- Turning the screw of a nut splitter in a clockwise direction will push the chisel into the nut.
- Turn the head of the screw in a clockwise direction to tighten the chisel and pinch the nut between the chisel and the anvil of the nut splitter.
- Continue turning the screw, so the chisel begins to cut into the nut, but stop once you hear a crack as the nut splits.
- Screw the head of a nut splitter by a socket and ratchet.
- You will have to use a socket or spanner on the head of the screw to get the torque (turning force) required to turn it.
- You may also have to hold the nut splitter in place while you tighten the screw.
- It can sometimes be easier to do this using an adjustable spanner on the nut splitter’s handle.
- Unscrew and remove the chisel of a nut splitter from a nut that has been split.
- Turn the screw head of the nut splitter in an anti-clockwise direction and push the chisel back into the handle of the nut splitter until it is free from the nut.
Note: If your nut splitter has an attached chisel, you will not need to push the chisel back.
- Repeat steps 2-4 to split the other side of the nut.
- If your nut splitter only has one chisel, you may have to repeat steps 2-4 with the chisel cutting into the opposite side of the nut.
For a Hydraulic nut splitter:
- Connect the splitter to a hand pump or battery-powered pump.
- Unscrew the chisel and place the ring over the nut.
- Position the chisel over the nut, so the blade faces a flat side of the nut.
- Tighten the screw to clamp the nut between the chisel and the ring’s inner edge, tightening further until the nut is split. The cutting blade will do the nut splitting.
Notes:
- Make all appropriate hydraulic connections.
- Place the nut splitter head over the nut.
- The flat surface of the cutter must rest flat on one of the nut flats, and the head must rest on a flat surface.
- Hold the nut splitter in the proper position.
- Operate the pump until the cutter blade cuts through the nut.
- To avoid damage to the bolt thread, de-energize the pump as soon as the nut is split.
- Retract the blade.
- Repeat the cutting process on the other side of the nut. (Must be 180 degrees opposed).
- Retract the cutter blade and remove both nut halves.
Safety Warnings:
- Always wear proper personal protective gear (i.e., gloves, safety glasses).
- The system operating pressure must not exceed the pressure rating of the lowest-rated component in the system.
- To avoid damage to the nut splitter blade, housing, plunger, and seals:
- Do not cut chains or bolts.
- Do not use the nut splitter to rotate nuts.
- Do not move the nut splitter during the cutting operation.
- Do not heat nuts while the nut splitter is in position.
- Ensure that all system components are protected from external sources of damage, such as excessive heat, flame, moving machine parts, sharp edges, and corrosive chemicals.
- Enerpac Nut Splitters are designed specifically for metal nuts that match the sizes as listed in the selection charts in the Enerpac catalog and nut splitter instruction sheets.
- Do not place fingers on or near the cutting blade to prevent injury while using the nut splitter.
- The maximum allowable hardness of the nuts to be split is HRc-44.
- To prevent injury and to avoid damage, do not use the nut splitter on glass, plastic, wood, or any material which could shatter.
Will a nut splitter damaged threads?
No. a nut splitter will not damage the bolts or bolt threads. Nut splitters enable you to remove damaged and seized nuts easily. They are the last resort after trying to remove stubborn nuts with other methods without success.
Check this too: Torque Wrench 101: Comprehensive How to & Troubleshooting Guide
Can you use a nut splitter on a bolt?
Yes. You can use a nut splitter to free super stubborn bolts, nuts, or screws.
Can you split a nut with a chisel?
Yes. A rusted nut can be removed by splitting it with a cold chisel by placing the chisel along the fiber. Chisels work well when you need to remove a nut without using a cutting torch or reciprocating saw. It doesn’t matter if the nut has seized the bolt with corrosion or rust because splitting it breaks this bond.
- Drill a vertical hole down through the side of the nut using an electric drill and an appropriately sized drill bit.
- The drill bit will depend on the size of the nut you’re removing.
- Set the tip of a flat-edged chisel on the top of the nut so that the chisel blade is in line with the bolt shaft.
- The chisel blade should be directly over the drilled hole.
- Strike the head of the chisel repeatedly with a hammer until it splits and can be removed from the bolt.
Note: If you’re having a hard time after you’ve split one side, drill a hole on the other side of the nut and split the nut into two halves.


