Torque Wrench 101: Comprehensive How to & Troubleshooting Guide
A torque wrench is used to tighten nuts and bolts to a predetermined torque value. It allows fasteners to be tightened to the proper tension, helping avoid damage from the over-tightening of joints coming apart from under-tightening.
Applying the correct torque measure is important for equipment safety, assembly, and performance. Keep reading to learn how to use a torque wrench.
How does a torque wrench work?
The torque wrench is calibrated to apply a certain torque to a fastener. The amount of torque applied depends on the force on the tool’s handle and the length of the wrench. So, the torque formula is force x length = torque to work out the torque.
The handle contains an internal mechanical indicator that connects to a calibrated scale. When the indicator determines the desired torque has been reached, stop twisting the bolt.
The tools generally have an easy-to-read scale or display screen to show how much torque is applied.
They can be calibrated to read in lb·ft (pound-foot), lb·in (pound inch), or N·m (newton meter).
How to use a torque wrench
A Torque wrench is used for various tasks across many industries – including home repairs and maintenance, automotive, and construction.
It’s important to use this tool in applications where screws and bolts must be secure and tight. These tools allow the user to measure the amount of pressure being applied to fasteners to ensure it matches the recommended specifications for the job.
For example, in the automotive industry, it’s paramount that the right amount of torque is used for all fasteners on a vehicle to protect the safety of everyone who comes into contact with it.
It’s important to use tools that have been properly calibrated. If it’s been calibrated, it should be demonstrated with a sticker on the tool.
They often have a lock that needs to be disengaged before the handle can be rotated. Then line up the number on the handle with the center line on the barrel; by rotating the handle. Then put the lock on to avoid any risk of adjusting the setting when using it.
When using a click torque wrench, use one hand to hold the pivot in place, then the other on the handle. Next, rotate the tool until it makes audible noise. As soon as that happens, stop turning the wrench. You only need one click, or you overtighten the fastener. Once the tool is no longer needed, position the scale back in its lowest setting, to prevent impacting its accuracy for future measurements.
Refrain from using them on fasteners that have already been completely tightened with a conventional wrench or socket, as it could be that the right level of torque has already been exceeded. Instead, it’s better to loosen the fastener and then re-torque it to the right setting.
Different types or torque wrenches and their uses
Torque wrenches are available in many shapes and sizes. The main differences between them are how they read and how easily they can be adjusted.
Here are some of the different types and what they’re commonly used for:
Electronic Torque Wrenches
Also known as digital, they don’t feature any moving parts and instead work from an electric sensor. They sense how much twisting force is applied and tell the user via a digital display.
These tools include small chips which contain a memory stick to save readings, which can then be accessed on a computer
Beam Torque Wrench
The Beam Torque Wrench is generally inexpensive and easy to use. They feature a scale, and once the right level of torque has been reached, it stops at the right number.
The main beam features a handle on it used to employ force. The beam stays in place when used, and the scale shows the torque level. These tools can be used for tightening or loosening.
Click Torque Wrenches
A click torque wrench gives an audible sound when the correct torque setting has been reached.
This type features a spring-loaded lever adjusted by twisting the handle to the right setting. Unfortunately, the lever breaks when the required torque level is achieved, creating a clicking noise.
Most click types are ratcheting and may be used for tightening or loosening.
Hydraulic Torque Wrenches
This type is often used in industrial settings. They’re designed to reach the required level of torque through the use of hydraulics
Micrometer Torque Wrenches
These scales are often used in the manufacturing and transportation of cargo. Knowing the weight of a load is vital when transporting large amounts by train, plane, or ship because the weight may change the distribution of the freight. If it’s not monitored properly, this could endanger the crew and the rest of the cargo being transported.
Dial Torque Wrenches
A Dial torque wrench is widely considered one of the most accurate. However, they can be wider than other types, making them harder to use in small spaces.
As well as regular use in the automotive industry, these tools are used in the aerospace and defense industries.
How to calibrate a torque wrench
Calibration is the reading set on a tool that is done following standard methods. The readings help check the instrument’s accuracy and measure its performance. This is usually done using standard equipment or a pre-calibrated device. The calibration of any tool is determined by its type and the industry where it is used.
A torque wrench requires care and maintenance like any other machinery used. For example, if a torque wrench is not correctly calibrated, it will exert too much pressure and break a coupling part. In addition, if less than optimal torque is applied, it is sure to result in the less effective functioning of the parts.
Because calibration is the effective measure of an equipment’s good performance, it is necessary to get it done regularly. In case of a fall or an accidental slip, an instrument’s calibration getting disturbed is very high. For example, all industrial torque wrenches are recalibrated when they are accidentally dropped.
How to Calibrate?
While professional torque wrench calibrations are required for industrial applications, you can always learn a DIY calibration technique useful for personal works and purposes.
There is, of course, some mathematics behind the calibration of a torque wrench that you need to understand. The force applied is the torque which is the product of weight and distance. Torque (T) = force (weight) x distance.
The torque you get is the ideal output as some amount of energy is always lost to the environment due to the friction of the thread. This is one of the reasons you should keep all studs and nuts oiled at regular intervals to facilitate their easy repair and maintenance.
Items needed
- A 20-pound weight
- A bench vise/vice
- A thin rope/string
- Measuring tape
Steps to follow
Calibrating a torque wrench yourself is simpler than you probably imagined and can be done by anyone with a little bit of care and attention.
Measure the torque length from where your hand rests to its square drive.
Secure the vise/vice placing only the wrench’s square drive in it, securing it.
Multiply the length you measured in the first step by 20 pounds and set this as the value of the wrench, aligning it accordingly.
Tie the 20-pound weight on the wrench at the hand resting position that you measured from.
If a click sound emanates from the system, move the weight towards its head until the clicking sound ceases. If there is no click sound the first time, move the weight in the direction opposite to the square drive to the point where the click emanates and move it back until there is no more clicking.
Measure the distance from this point to the square drive and multiply by 20 pounds.
T= F x D will give you the torque measure of your tool.
Torque is a rotational force exerted when you close a door or push a merry-go-round. This same force is used to fasten or unscrew. A torque wrench is used to exert the force with which the fastening can be held or unscrewed.
The torque of a wrench is lost over time while using it. Factors like temperature and the immediate climatic condition of the environment play important roles in maintaining its accuracy. Testing a torque wrench at regular intervals and calibrating it optimizes operations and eliminates chances of errors and thus accidents.
While it is relatively easy to calibrate a manual torque wrench, hydraulic torque wrench and pneumatic torque wrench are highly sensitive tools that require professional testing and recalibration.
Testing the Calibration of the Torque Wrench
Measure from the square drive to the handle. The square drive is the end of the torque wrench you’d attach a socket to. For simplicity, use whole inches rather than using any fractions. Mark the point you measured to on the handle and record the distance on a piece of paper for you to come back to later.
Set the paper aside in a safe space until you need it.
Because 24 inches (61 cm) is a common length for most torque wrenches, it will serve as the measurement for further steps.
Secure the square drive in the vice. First, orient your bench vice to place the square drive of the torque wrench into and have the handle extend out, away from the table or bench. Then insert the square drive into the vice and tighten it until it’s secure.
Be careful not to overtighten the vice and damage the square drive on the torque wrench.
Make sure only the square drive is caught in the clamp, so the wrench can move under the weight you apply.
Calculate the appropriate setting for your weight. The equation is: handle distance times weight divided by 12. To determine the right setting for the torque wrench, multiply the distance you measured in step 2 by the 20 pounds you will be using for your weight. That comes out to 480 inch-pounds (24 inches times 20 pounds) which equates to 40 foot-pounds (480 inch-pounds divided by 12).[3]
If you’re working with metric units, start by converting the weight to Newtons. To do this, multiply the number of kilograms by 9.807. In this example 9.07 kg x 9.807 = 88.94949 Newtons. Then, multiply the number of Newtons by the length in meters: 88.94949 Newtons x 0.6096 meters = 54.2 Newton meters.
To convert foot-pounds to Newton meters, multiply by 1.35582. For this example, 40-foot pounds is equal to 54.2 Newton meters.
Be sure to use the correct distance and weight figures. If your wrench is a different size or you’re using different weights, your figures will be different.
Hang the weights from the handle of the wrench. Tie the rope to the weight and make a loop that you can hang from the torque wrench handle where you made your mark in step 1. Make sure the length of the rope is short enough that the weight won’t touch the ground once you hang it.
Do not securely tie the weight to the wrench. Instead, simply hang it.
Be sure nothing is in the way of or supporting the weight as it hangs.
Correcting Torque Wrench Calibrations
Adjust the torque wrench using the weight. You can usually adjust the spring tension in a torque wrench by turning a screw located midway up the wrench’s handle with a screwdriver. Hang the 20 lb (9.1 kg) weight from the torque wrench at your first mark and see if it clicks. If it doesn’t, tighten the spring by turning the screw clockwise, then lift the weight and lower it again to test it.
Repeat this process until the torque wrench clicks using the known weight.
Be sure to lift the weight off the wrench and lower it again to test for clicking each time.
Move the weights up the handle if you hear a click. Listen for a click from the torque wrench as you hang the weight from the marked point on the handle. If you hear one, lift the weight off the handle and set it down further up the neck, moving toward the head of the wrench.
Keep repeating this process until you stop hearing the click.
Be sure to lift the weight off and set it down again each time. Do not slide it up the handle.
Lower the weights if you don’t hear a click. If you don’t hear a click from the torque wrench as you place the weight on it, move the weight down the wrench’s handle until you hear one.
Start by moving the weight an inch or so at a time.
It’s okay to move the wrench’s handle up and down severally as you look for the point at which it starts to click.
Mark the point of transition. Once you find the point in which the handle transitions from clicking to not, mark it on the wrench with your pen. Be sure to mark the point exactly, so you may need to make multiple attempts at identifying where it is by moving the weight up and down the handle.
The part of the handle where it begins or stops clicking is called the transition point.
Measure from the square drive to the point of transition. Use the measuring tape to find the distance from the square drive to the transition point you identified using the weight. Record that number on a piece of paper and set it aside. A measurement of 26 inches (66 cm) will be used for this example, but yours may be different.
Be careful not to confuse this number with the figure you recorded earlier.
You may want to test finding the transition point more than once to ensure you have the correct number.
Calculate the applied torque. If the transition point of the torque wrench with 20 pounds was at 26 inches, for instance, multiple that by 20 pounds to determine the amount of torque applied: so 26 inches times 20 pounds equals 520 inch-pounds, or 43.33 foot-pounds (520 divided by 12 inches ).
The equation is the same as before: measurement length times weight, divided by 12.
If you’re using metric units, convert the weight to Newtons (kg x 9.807), then multiply the number of Newtons by the length in meters: 9.07 kg x 9.807 = 88.95 Newtons. 88.95 Newtons x 0.6604 meters = 58.74 Newton meters.
Correct for the difference you identify. If you cannot adjust the torque wrench, you can still use it pretty accurately if you adjust the settings you use on the wrench to compensate for the difference. Divide your first measurement by the transition point (in this case, 24 divided by 26, which equals 0.923). Then, multiply the correct torque by this number whenever you need the torque wrench.
Multiplying your intended torque by the difference will give you the correct setting for your specific torque wrench.
This solution can keep you working, but the wrench will still need to be calibrated.
Maintaining the New Calibration
Return the scale to zero after each use. While all torque wrenches will need to be calibrated regularly, you can prolong each calibration’s life by returning the torque wrench’s setting to zero after each time you use it.
The strain on the internal spring can cause the calibration to drift if not left at zero.
Keep a tight grip on the torque wrench. Dropping your torque wrench onto any hard surface can instantly affect the tool’s calibration. So be sure to set the torque wrench down in safe places to avoid letting it fall, and never use a torque wrench in place of a hammer or lever.
Banging a torque wrench around will immediately affect its calibration.
Torque wrenches have even been known to break when dropped.
Use the torque wrench only for appropriate tasks. Because a torque wrench looks similar to a breaker bar, people often use them interchangeably. A torque wrench should only be used in instances that require specific torque specifications. Using it for other jobs can affect its ability to maintain its calibration.
Using a torque wrench in place of a breaker bar or a different type of wrench can affect calibration or even damage the wrench.
Treat the torque wrench as a specialty tool rather than an all-purpose one.
Stay within the torque wrench’s upper and lower limits. Exceeding the prescribed limits of a torque wrench can damage it or might affect the wrench’s calibration. Many torque wrenches have indicated upper and lower torque tolerances. Never use the wrench for jobs that require more or less torque than your wrench is rated for.
Exceeding the maximum torque rating for a wrench may even break it.
If you damage your torque wrench, it may not be able to hold a calibration any longer.
Store your torque wrench in its case and by itself. Because torque wrenches can be easily affected by impacts and even temperature changes, it’s best to store your torque wrench inside its protective case and separate it from other commonly used tools.
Store the torque wrench low, so if it does fall, it won’t be far enough to cause any significant damage to the calibration.
Keep the torque wrench in a climate-controlled area. Big shifts in temperature or humidity can affect its calibration.
How to read a torque wrench
Knowing the torque, you’re applying to a nut is essential for the stability of a piece of machinery or structure. If you use too little torque, the nut may not be secure, and if you apply too much, you could strip the threads along with the bolt.
Luckily, several types of wrenches will help you determine how much torque you’re applying. The most common types of these tools are micrometer, beam, dial, and digital torque wrenches. If you use your torque wrench correctly, it should be simple to read it.
Reading a Micrometer Torque Wrench
Rotate the knob on the end of the handle counter-clockwise. Turning the knob on the end of the handle will loosen the torque wrench and allow you to rotate it. Loosen the knob before you try to adjust the torque settings.
Find the vertically listed numbers above the wrench handle. You should see two vertical numbers on both sides of your torque wrench. One side of the wrench will be in foot-pounds or ft.-lbs. The other set of numbers will be in Newton-meters or Nm.
These are both different units used to measure torque. The vertically listed numbers are usually called the major scale and represent the amount of torque your wrench is set to the nearest ten.
The numbers will have horizontal lines running next to them.
Find the numbers wrapped around the wrench’s handle. The numbers around the wrench’s handle are usually called the micrometer. These numbers measure the second number in your torque measurement and allow you to set a more precise torque level.
Turn the handle on the wrench to adjust the torque setting. Turning the handle clockwise will increase the torque while turning it counter-clockwise will reduce it. As you rotate the handle, it will move up and down while the numbers on the micrometer rotate. Turning the handle will simultaneously affect the major scale and the micrometer scale.
Set the wrench for the precise torque you’re seeking. Line up the vertical line on the handle of your wrench with the vertical line above each number on the micrometer to reach your desired setting.
For example, if your major scale is slightly above the 90-ft.-lbs. (122 Nm) horizontal line, and the three on the micrometer line up with the vertical line, which means that your wrench is set to 93 feet (28.3 m).-lbs. (126 Nm).
Tighten the knob at the end of the torque wrench. Turn the knob at the end of the wrench handle clockwise. This will tighten the wrench and set the torque level on the wrench. If you need to adjust the torque again, loosen the knob and turn the handles to the torque needed.
Be careful when tightening the bolt because you could lose the measurement if you drop the wrench.
Listen for the click while you work. For example, you’ll hear a click using the wrench when you reach the set torque level. Stop tightening when you hear that click.
Store the wrench on the lowest torque setting, so there isn’t tension on the mechanism.
Understanding the Numbers on a Beam or Dial Torque Wrench
Look at the meter at the bottom of the torque wrench with numbers and an arrow. The numbers represent the torque in foot-pounds (ft.-lbs.) or Newton-meters (Nm). Wherever the arrow is pointed, designates the amount of torque that you’re applying to a lug or nut. In the stationary position, the wrench should read 0.
Turn the wrench around a nut or bolt and look at the arrow. As you turn the wrench around a nut or bolt, the arrow will move and represent the amount of torque you’re applying. For example, if you turn the wrench around the nut and it reads 30 lbs.-ft (40.7 Nm), you’re applying that torque level to the nut. Apply force slowly to avoid damaging the bolt.
Read the arrow from directly above so you get an accurate reading.
Some dial torque wrenches will have a memory arrow that follows the main arrow and stays at the highest torque level. This makes it so that you’ll know the max torque you were applying to the nut even if you disengage the wrench.
Put a piece of tape on your desired torque line to read it more easily. There are a lot of lines and numbers on a beam or dial torque wrench, so it may be hard to see it without the tape. If your wrench doesn’t have a memory arrow, you can put a piece of tape next to the line of the desired amount of torque. Putting tape near the line will make the wrench easier to read.
Using a Digital-Read Torque Wrench
Read the instruction manual that came with the wrench. The instruction manual will tell you how to adjust the torque settings on your wrench and explain how to change the units of measure to read in either foot-pounds (ft.-lbs.) or Newton Meters (Nm).
Clean the bolt threads you want to torque without any lubricant or tape.
Some digital torque wrenches will also have other settings that affect the sounds and vibration levels.
Use the arrow keys to set a designated amount of torque. Press the up or down arrow to change the torque setting on the wrench. Continue to modify the numbers until you hit your desired level of torque.
Set the tolerance parameters with the % key. Some electronic torque wrenches will have tolerance parameters that help you with precision. These parameters allow you to set a warning on your wrench before reaching the desired torque.
For example, if you set the tolerance parameters to 10%, the wrench will start lighting up and vibrating when you’re within 10% of your desired torque. Set the tolerance parameters by hitting the % key and then change the percentage using the arrow keys.
Use this setting if you need precise torque.
Stop turning the wrench when it lights up or makes a noise. When you reach the torque you need, the wrench will make a sound, light up, or vibrate. Stop turning the nut when this happens.
Note: If you’re tightening the bolts on your car’s tires, you can refer to the owner’s manual to see the required torque to tighten them. For other items, check product descriptions before you try to tighten a nut to know how much torque is required to tighten it.
Not tightening bolts or lugs enough could cause your equipment to fall apart and is unsafe.
Adjust the torque if you use any offsets, extensions, or adapters. Use 1 ft-lb (1.36 Nm) per 1 in (2.5 cm) of extension.
How to adjust a torque wrench
Loosen the tightener at the end of the wrench’s handle. Look at the end of your wrench’s handle to find the tightener that locks the settings. It is usually a plastic or metal cap stuck into the end of your wrench. Often, it is a different color than the rest of your wrench as well. Twist it counter-clockwise by hand to loosen the piece so that you can change the wrench’s settings.
You don’t need to take it off of your wrench. Instead, loosen it until you don’t feel any resistance.
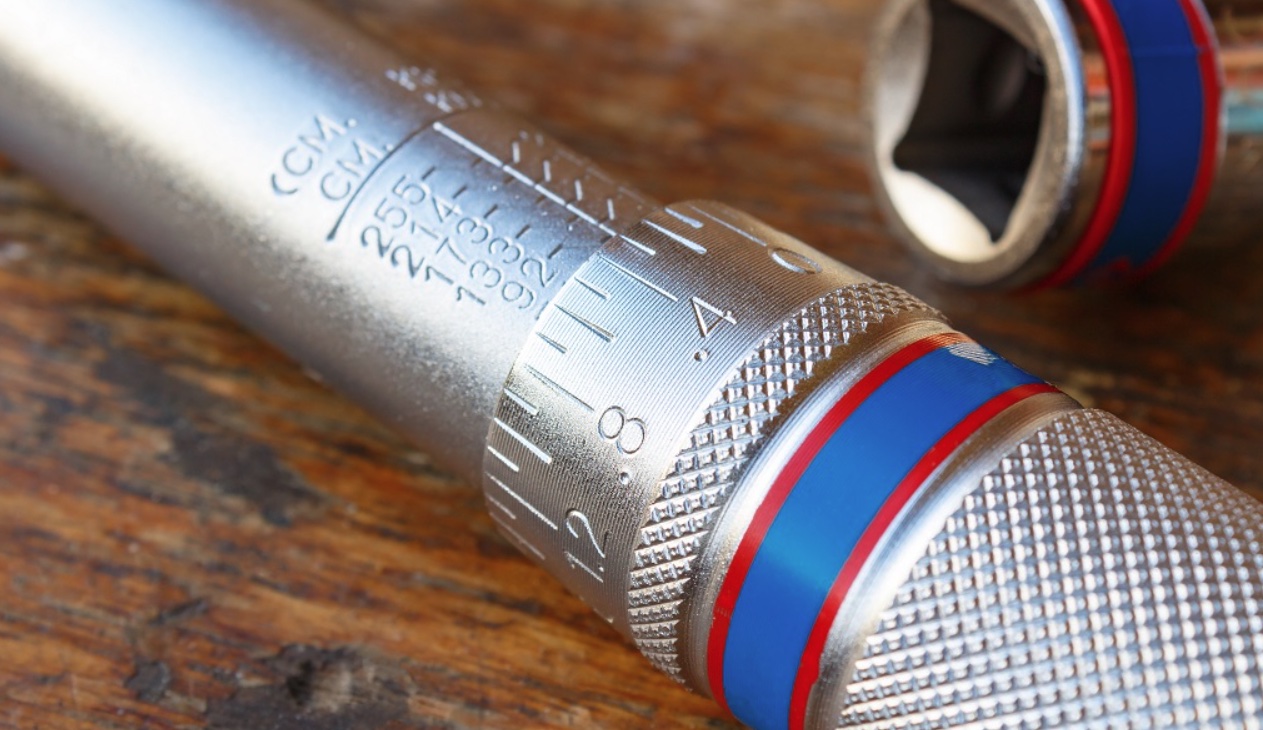
Find and identify the torque measurements on your wrench. Inspect the area near your handle to find the hash marks for the torque setting. There will be 1 set of larger numbers on the body of the wrench and 1 set of smaller numbers on the handle. The smaller numbers are the smaller digits, while the larger numbers are the larger units.
Torque is measured in pounds or meter kilograms (ft-lb or m-kg). Therefore, your torque wrench will list two numbers on the wrench’s hash marks. The lower number is the measurement in foot pounds. The larger number is the measurement in meter-kilograms.
The vertical location of the edge of the handle determines the baseline, while the rotation of the handle determines the smaller digits. There is a center line on the wrench to show where the handle is set.
For example, if the edge of the handle is on the hash mark for 100, and the smaller number on the handle itself is turned to 5, the torque setting for the wrench is 105 ft-lb (1397 m-kg).
Turn the dial to raise or lower the torque setting on the wrench. With the tightener loosened, brace the body of the wrench with your non-dominant hand. Next, turn the handle clockwise to raise it or counter-clockwise to lower it. Once you reach the desired hash mark, stop turning the handle.
If you need to reach a specific number, raise the handle to the hash mark within five ft-lb (200 m-kg) of your number. So if you know you need to reach 140 ft-lb (1860 m-kg), raise the handle to the hash mark between 135-145 ft-lb (1795-1928 m-kg).
Some torque wrench handles slide up and down instead of twisting into place.
Note: Refer to your car or bike’s manual to determine how much torque a nut or bolt requires to be safely set. There are no universal rules for torque settings on vehicles.
Twist the dial on the handle to make minor adjustments. Once you’re close to the desired number, focus on the dial.
Follow the readings as you turn the handle slowly. As you turn clockwise, the number goes up. As you turn counter-clockwise, the number goes down.
There are a few negative numbers after 0 to move down a little.
The dial moves independently of the handle on some wrenches, and you can twist it by turning the dial, not the handle.
Add the smaller digit on the handle to the number on the larger hash mark to determine total torque. Once you’ve adjusted the handle’s height and twisted the dial, calculate your total torque to ensure it’s accurately adjusted by adding the numbers together.
Take the hash mark on your handle and add the number marked on the dial to get your torque. So if the dial reads four and the handle reads 50, your total torque is 54 ft-lb (718 m-kg).
You add the negative numbers as well. So, for example, if your hash mark is 120 and the dial is -2, you add 120 to -2 to get 118 ft-lb (1569 m-kg).
Screw the tightener back into the end of the wrench by hand to lock it. To lock a torque setting into the wrench, flip it back over to the handle. Brace the wrench in your non-dominant hand to keep it still. Twist the tightener clockwise by hand until it doesn’t move anymore. This will lock the handle in place.
Once you lock the tightener, you cannot adjust your torque setting.
How often should a torque wrench be calibrated?
The rule of the thumb is that you need calibration once a year or once per 50,000 clicks. So if you work on cars or bikes every day, you probably reach 50,000 clicks after 8-10 months. On the other hand, if you’re a DIY enthusiast, you’re unlikely to hit 50,000 clicks before the year is up.
As per the official website of the International Organization of Standardization, ISO 6789 states that a torque wrench should be recalibrated every 5000 uses or every 12 months.
Why is my torque wrench not clicking?
When using a torque wrench, it should click. The click sound indicates that the tool is accurate and set to the desired torque value. When tightening a bolt using a torque wrench, you do not exceed the required torque. If you do so, you can damage the bolt or the cords in the nut.
How to use a dial torque wrench
Torque is a rotational force. It is measured in lb·ft (pound-foot), lb·in (pound inch), or N·m (newton meter). The torque wrench will have these different markings on each side. The most common is foot pounds (lb. ft).
Each vehicle has a different torque specification set by the manufacturer. This can be found in the vehicle’s manual.
You can change the settings on your torque wrench to increase or reduce the torque. To do this, simply turn the handle clockwise for more torque or anti-clockwise to decrease it.
The tool will generally have a scale or display screen depending on the model to show how much torque is applied.
Torque wrenches come in many styles and sizes with different torque ranges. The most common size is a 1/2″ square drive, but this depends on the fastener and application.
Using and setting up your torque wrench:
The first step you want to take when using and setting up your torque wrench is finding out the torque value. As mentioned above, this can be found in the user manual or sometimes online. Make sure you look at the correct scale on your torque wrench, as most give you lb·ft on one side and lb·ft or N.m on the other.
- Loosen the knob at the bottom of the torque wrench. This will allow the handle to twist back and forth
- If the required torque is 100 lb. ft, you want to rotate the handle until the ‘0’ meets the 100 lb. ft line
- Tighten the lock nut back up once you have set your required torque to lock it in place. This step is very important
- Put your socket onto the torque wrench
- Place it over the lug nut
- Simply grip the handle and tighten
- When you hear a click, the required torque has been met
- Points to remember when using and working with torque wrenches:
- Once you hear the click, don’t tighten the nut any further. One extra click is needed for the fastener to be overtightened.
- Don’t use your torque wrench to tighten the fastener fully. Instead, do most of the work with your ratchet and finish off with your torque wrench to get it to the required torque.
- If the socket isn’t deep enough, you may need to use an extension.
Note: Always handle your torque wrench with care. Store it in its supplied case when not in use. This prevents it from knocks and bumps, affecting its performance, accuracy, and calibration.
When you store your torque wrench, loosen it to the lowest setting. This helps it stay in calibration much longer as there isn’t as much force on the spring.
How to use a Beam Style Torque Wrench
A beam-style torque wrench is considered a must-have tool by automobile enthusiasts. This device allows users to fasten nuts and bolts to the exact “tightness” specification, called “torque,” recommended by manufacturers. Torque is simply the direct force required to rotate a nut or bolt around its axis.
In addition to automotive uses, torque wrenches are excellent tools for properly maintaining all other mechanical devices that rely on nuts or bolts for their assembly. Beam-type torque wrenches are easy to operate and will last a lifetime if given proper care and maintenance.
Items Needed
- Clean rag
- Light machine oil
- Socket set (SAE or metric)
- Locate a socket that fits the nut or bolt you wish to torque. On smaller fasteners, sockets with a 3/8-inch drive are most common. On larger sockets, a 1/2-inch drive is a norm. Torque wrenches may be converted from a 3/8-inch drive to a 1/2-inch drive with an inexpensive adapter available at all hardware stores.
- Attach the socket to your torque wrench by pressing the square end of the socket onto the “drive” of the torque wrench. The drive is the square metal peg located on one end of the torque wrench. Set the wrench aside, and hand tightens the nut or bolt that will be torqued as much as possible.
- Place the socket onto the fastener to be tightened. Hold the tool so that the handle’s pivot is the only part of the handle to touch the center beam. Remember to keep the handle centered as you apply pressure to the tool so that the handle does not touch the beam, except at its pivot point
- Apply turning force (torque) by pulling the tool toward you clockwise. As you pull tighter, you will notice the handle bend slightly. This calibrated bending is the result of applied torque. Watch the end of the needle located just above the handle. As the beam bends, the needle points to the amount of torque applied. Most tools have torque measurements embossed on the handle in foot-pounds, the terminology used in the United States.
- Continue to turn the fastener and allow the handle to rotate so that the pivot is the only thing contacting the beam. Pull evenly, and apply enough force to bend the beam until the correct amount of torque is indicated on the handle.
- Slowly release pressure from the torque wrench when the specified torque has been attained. Remove the socket from the fastener, and wipe off any grease that may have gotten on the torque wrench. Apply a small amount of light machine oil to a rag, and wipe down the tool before placing it in storage.
Note: Beam-style torque wrenches contain a floating handle, allowing the handle to pivot as you turn the wrench. When held properly, the handle exerts pressure on the end of the tool, thereby allowing precise torque application.
How to use a click-type torque wrench
Follow these steps when using a click-type torque wrench;
Step 1. The Specification
You will need to find what specification the bolt or screw you are using requires. This is necessary, so you tighten the fastener to the correct point. You can then set the wrench to the correct torque setting. The wrench will have a rolling dial to set the needed torque specification.
Step 2. The Fastener
Before using the torque wrench, you want to thread the fastener, normally a bolt or screw, by hand. You do not need to get this hand tight. Just make sure it is securely on the threads. Then, attach the socket to the torque wrench.
Step 3. Tightening the Fastener
Now that the wrench and fastener are in place, you can place the socket head over the fastener head. You cannot use the wrench quickly because you must tighten the bolt slowly. As the bolt becomes tighter, you will find the wrench turns slower. It is important to pull smoothly. If you jerk the wrench, then you may cause the wrench to click too early as you are making the pivot point break too early.
Step 4. The Click
When you hear a click from the wrench, it will have reached the correct torque. However, this click is not overly loud, and many people feel the click rather than hear it. At this point, your bolt has been tightened to the specified tightness.
If you go past the click, you will have over-tightened the fastener, which can cause problems. The click occurs when the pivot point and the handle grip have reached the breaking force.
Step 5. A Sequence of Bolts
There will often be more than one bolt to bring the two materials together. The sequence in which you tighten the bolts is important. You want to check what the directions say.
Many times going in a criss-cross pattern is good. However, if you start on a bolt and tighten them in a circular order, you can cause the part to crack and damage. Think about changing the tire on your car. You must tighten the bolts in a criss-cross pattern.
Step 6. Going too Far
If you have gone past the click, you will need to unscrew the bolt and then retighten it to the correct tightness. You will often find that the fastener cannot go past the required tightness as it will become very difficult to turn the wrench.
However, this point will often not be completely tight as the pipe or object may swell with use, and the tightness of the fastener will take this into account.
How to test a torque wrench
You can test your torque wrenches’ accuracy by checking the calibration. Here are some common tools you can use to check whether a torque wrench is properly calibrated:
Torque Analyzer
This digital device is easy to use. It features a display that lets the operator know if the wrench is accurately calibrated. In addition, some analyzer units allow you to connect with various external torque sensors and have operating modes that let you conduct tests on different tools.
If using a smartphone is easy for you, this analyzing tool will probably feel familiar. However, some testers or analyzers do not need to sit on a level surface. Others should be mounted to a fixed surface like a workbench.
The menu screen will display options, including “Quick Test,” “Units,” “Mode,” “Setup,” and “Filter.”
- Start by applying torque to the input of the analyzer.
- That movement is transmitted to an indicator, which rests on the maximum torque reading until it is zero.
- You will notice that the reading on the wrench scale is compared with the reading on the tester.
- Simply follow the device’s prompts to determine if the torque wrench needs to be calibrated.
- The analyzer will produce a reading indicating whether calibration is needed. As a bonus, these readings can be quickly uploaded to your computer.
Torque Loading Bench
This equipment provides quick and easy torque wrench calibration. In addition, the wheel ensures smooth manual loading and operates in both a clockwise and counter-clockwise direction.
- Secure the loader on a solid bench top or another stable surface.
- Place the torque wrench on the transducer connected to the loading bench.
- To maintain greater accuracy, use the pre-setting position to eliminate accidental adjustments.
- The large handled wheel moves both clockwise and counter-clockwise, making loading easier.
- Slide the loading device assembly along the reaction bar. The bar should allow enough clearance for the torque wrench to be installed.
- Choose the lowest capacity torque transducer to test the wrench.
- Ensure the wrench handle runs along the length of the reaction bar.
- Mount the wrench in the female square drive of the torque transducer.
- Now, slide the loading assembly along the reaction bar, so the support spindle reacts against the normal hand position of the wrench. This will be the center of the wrench’s handgrip.
- If the wrench being tested has a square-drive ratchet, make sure the orientation of the ratchet allows maximum movement of the wrench handle by the support spindle.
- Position the spindle, so the wrench keeps a horizontal position during testing.
- Before you load the equipment, secure the clamp plate.
- Smoothly turn the handwheel to apply load to the torque wrench.
Note: A torque transducer should be attached to a display instrument to measure the applied torque. This will show you if the wrench is properly calibrated.
How to use a snap-on torque wrench
A snap-on torque wrench is the easiest wrench to use. Read on to find the difference between torque wrenches and understand how to set the snap on the torque wrench.
Step 1 – Safety
Follow the necessary safety precautions while setting the snap on the torque wrench. Wear work gloves at all times for your safety and a better grip.
Step 2 – Prep Work
The functioning of the snap-on torque wrench is exhibited in the sound that it generates while in action. So make sure that you are working in an environment with minimal or no background noise.
Step 3 – The Torque Level
Before setting the torque levels on your wrench, you need to know the appropriate amount for the appliance in question. Most the appliance comes with a manual that recommends the specific amount of torque applied.
Step 4 – For Manual Wrench
To set the snap on the torque wrench, you need to make some settings on the wrench. If you have a manual wrench, the markings will be located at the head of the torque wrench. This is a dial torque, and you can adjust the torque setting by turning the outer ring to the required amount of torque till it coincides with the mark on the indicator.
Step 5 – Marks on the Handle
The marks can also be found on the torque wrench’s handle in a manual wrench. You can establish the exact amount of torque by holding the handle to the appropriate amount, then push the grip and move clockwise until it coincides with the mark on the handle.
Step 6 – How it Works
The torque wrench will keep generating a click sound. The clicking will go on until the exact amount of torque has been applied to the bolts of the appliance.
Step 7 – Battery
Examine your snap-on torque wrench. The bottom of the wrench will have a cap that can be unscrewed. Introduce three batteries which are AA+, into this slot. The positive side should face the head of the torque wrench.
Step 8 – Turn it On
In this step, you need to turn the wrench on. This can be done by depressing the round button. As soon as you press the button, the screen will come to life.
Step 9 – Key the Units
After the torque shows display, you need to key in the exact amount. The U on the unit will help you key in the exact amount. Keep pressing it till you get the right setting.
Step 10 – Adjust
You can also adjust the torque setting. Again, the up and down buttons will help you increase or decrease the setting.
Step 11 – Apply
Having set the right amount of torque, you can proceed with the job. Place the wrench on the bolt of the appliance and turn the wrench. The job has been completed successfully when you hear beeps, and the handle starts vibrating.
Step 12 – Caution
This device is a very powerful tool. However, do not overestimate the torque required. This will cause the bolts to crack.
How to use a torque wrench to loosen a bolt
Here are some steps to follow for the proper guidance when using a torque wrench to unfasten the nuts.
- Inspect the wrench for any damage
- Next, unlock the device.
- Set the counter-clockwise direction of the drive head
- Check and adjust the desired range
- Place the range from low to high
- Lock the wench
- Adjust the correct sized socket square drive to the head
- Set into the target bolt
- Apply pressure and remove the tight bolt
Why and when should you use a torque wrench
A torque wrench is used to check and adjust the tightening torque of bolts, screws, and nuts.
A torque wrench is a precision tool that guarantees reliable and quality tightening. Its use is essential to avoid deterioration or breakage on the various clamping parts.
The tightening torque is expressed in Newton Meter (N.M). N.M represents the moment of a force of 1 newton with a lever arm of 1 meter.
Depending on the type of application and the materials, it is advisable to tighten to the right torque, referring to the instruction manual.
Here are some steps to help you make your choice:
- Torque from 1 to 20 N.m: for tightening on fragile parts (carbon bike, small aluminum parts, etc.)
- Torque from 20 to 150 N.m: for cars, motorcycles (cylinder heads, damper pulleys, rims, etc.)
- More than 150 N.m: utility or agricultural use, for very high tightening forces.
Uses based on the different types of torque wrenches;
Click wrenches:
For easy, practical, and quick use, the trigger wrenches indicate via an audible or sensitive signal once the torque value is reached. Therefore, it suffices to set the desired tightening torque directly on the wrench before use.
Click wrenches come in handy when you need to do an operation quickly or when the light is low
Digital torque wrench:
For applications where the tightening torque must be very precise, direct reading wrenches directly display the torque value allowing you to optimize the tightening.
Hydraulic assisted wrenches:
These wrenches are designed to achieve very high tightening torques that are difficult to reach manually.
How to know when a torque wrench is done
Torque wrenches are created to tighten and loosen bolts by applying a specific torque level. It is usually done by a clicking mechanism, which alerts when the proper torque is applied. The torque applied to the screws increases as the lever arm extends.
The clicking mechanism is usually a spring-loaded collar that rides up and down a rod. When the precise torque is reached, the coupling will hit a stop and produce a clicking sound.
The click torque wrench makes audible sounds when correct torque settings are achieved. This model has springs pushed in and is adjustable with a twist. Unfortunately, the lever breaks once a required torque level is reached and produces an annoying click sound.
A torque wrench clicks when a pre-set amount of torque has been applied. It tells the user that they have reached the expected torque and can stop tightening. A torque wrench click will depend on the tool’s settings, but it is normally around 6-8 times.
How to tell if my torque wrench is broken
A broken torque wrench will not be able to tighten bolts. This is because it is not properly calibrated or it is damaged. To check the accuracy, follow the steps discussed above.
Depending on how severe the damage is, you can repair the torque wrench at home. First, reassemble your wrench, clean it to remove debris, oil, or grease, and look for severe damage.
Is My Torque Wrench Repairable?
Yes, if there is no severe damage, you can repair your torque wrench. But make sure to keep your torque wrench out of service until you are done with the repair.
Your Torque Wrench Would Be Repairable If:
· Directional Switch Is Broken
When you misuse the switch or apply greater force, it causes a broken directional switch. The torque wrench is also repairable if the directional button is broken. You need to rotate your wrench in a clockwise direction for precise tightness and anti-clockwise to lose the screws.
If you turn the wrench in the opposite direction, it can damage the switch. You can replace the directional control for better performance next time.
· The torque Wrench Head Setting Pin Is Gone
The setting pin usually disappears when the torque wrench is dropped. If the replacement parts are available, a professional can easily replace the plugs settings.
· Issues in reading the torque
It is best to reset the torque wrench after every use because it is essential for an accurate reading. If you found an issue regarding the accuracy, keep resetting your wrench at zero after every use. It will help place the spring in proper shape, and there will be no issues in readings.
· The square Drive Is Twisted
If a square drive is twisted, it can lead the negative measurements. A Square drive is essential for proper tightness of the nuts and bolts. If you feel any issue in movement, replacing the drive is always the best option.
· Water issues
Torque wrenches are not waterproof tools; some parts show errors when they contact water. Torque wrench care is a highly recommended tool for its accuracy and performance. But sometimes, accidentally, if the torque wrench slips and come in contact with water, it would be better to dry it immediately.
For every wrench user, it is essential to know how to store a torque wrench. And, remember that using water to clean the wrench before and after every use is not a good idea. For example, suppose the water gets inside the calibrator and ratcheting components. In that case, these parts will lose the frictions and affect the spring’s stability.
· Missing click
Suppose the torque wrench is not working correctly with some issues around the mechanism. In that case, it will not help you measure the correct amount of torque. Likewise, you will not adjust the wrench with a broken socket and give the wrong output. But, it is somehow repairable by scraping off the rust and giving it rust, preventing coating from maintaining the tool’s performance afterward.
Suppose you are working with a click-type torque wrench and want to know how to check torque wrench calibration! When the required torque is obtained, you can feel a click, which means the wrench is appropriately calibrated. However, if it misses a click for some reason, it’s an alert to recalibrate the wrench.
· Broken drive head
Sometimes, the torque wrench head gets disfigured, so the broken drive head is repaired. Replace the drive head and maintain the accuracy and functionality of the wrench again.
· Free-Wheeling
It helps to spin the square drive freely, without any resistance. Unfortunately, free-wheeling is affected by some reasons like a drop. However, an expert can repair this free-wheeling, and you can easily use a fixed torque wrench.
· If Torque Setting Rod Protrudes Over the End Of The Handle
Sometimes, the inner rod of the wrench’s handle protrudes past the end of the handle. It usually happens because of improperly assembled torque wrenches when users fix problems independently. Self-replacements sometimes cause significant issues, and it is better to ask a professional for help.
How To Fix Torque Wrench?
The tool provides a specific torque to the nuts and bolts. If you are not using the right and accurate torque wrench, the process could be thrown off. When you feel your device is off or have some issues, then fix the torque wrench by using these techniques:
1. Recalibrate
Although torque wrenches are precision tools, they also get out of calibration with time. So, it is better to check torque wrench calibration periodically. You can quickly recalibrate your wrench to bend until the pointer is back to the center. It would help to make your wrench more accurate.
2. Reassemble
To fix the torque wrench, reassembling the torque wrench is a trick to make the wrench more precise. You should disassemble torque wrench parts and assemble them correctly with proper calibration errors. Perform this trick to fix your wrench only if you have enough knowledge about torque wrench parts.
3. Clean the wrench
If you are using your wrench at places that require oil or other lubricants, it can also affect your tool performance. So, it is essential to wipe the tool properly to avoid the oil getting inside a torque wrench. Proper maintenance and cleaning can keep it accurate and prevent any corrosion.
4. Checkout for breaks and cracks
The torque wrench is usually made up of metal that can break and has cracks sometimes. Therefore, keep checking for any physical damage to the wrench. If you found any sign and repair is not fixable, replacing is safe.
How To Maximize The Torque Wrench Accuracy
To maximize the torque wrench accuracy, here are some tips and measures to follow:
Turn the equipment slowly and steadily, stopping when you hear or feel the click, indicating that the desired torque has been reached.
Pay attention to the requirements for measuring torque. For example, apply force on a dry fastener; you won’t acquire highly precise measurements when your fastener is greased or unusually hot.
Over-torqueing the nuts and bolts can result in damaged parts and early deterioration.
Under-torqueing the bolts can result in loose parts, which can fail or come apart suddenly.
The toque wrench measures the force applied at the pivot point, just below its head. It has been calibrated so that this force accurately corresponds to the amount of torque shown on its scale only when you apply force on the handle and nowhere else.
Most torque wrenches have a line or groove in the handle to indicate where you should push on the device.
How to properly tighten your car wheels using a torque wrench
Follow these steps to tighten your wheels securely;
1 – Preparation
- Inspect the nuts before reassembling the wheel to verify that they are suitable for the intended use. If there are cracks, deformations, or fatigue, change them
- Make sure the nuts and studs are clean (mud, salt, or rust). If dirt has accumulated, it will affect the quality of the tightening. Remember to clean them if necessary
- Lubricate nuts and studs. This can be done using a small manual oil pump, placing one drop of oil between the nut and washer, and rotating the washer to distribute the oil evenly.
- Star tighten nuts, i.e., first tighten opposite nuts next to each other rather than side by side. This ensures good contact between the wheel and the hub.
2 . Pre tightening
Use a pneumatic impact wrench to perform the pre-tightening (approach) operation. This operation can also be carried out with a battery-electric shock wrench or a manual wheel wrench
3 . Torque adjustment
Adjust the torque wrench via the twist grip to achieve the desired torque. The values are indicated on the handle of the wrench
4 . Wrench setup
Install the tightening sleeve on the end of your torque wrench. If the wheels are tightened on the rim, remember to use a socket with protection (socket metric wheel protector set) so as not to damage/scratch the rim when tightening,
5 . Tightening
Complete the tightening with the key until it clicks
- Screw clockwise. Screw-in until you hear a click. Tighten the others in the order listed using the same technique.
- Use only one hand with a smooth and continuous motion. Most torque wrenches have a mark on the handle. This is to indicate where to apply pressure.
6 . Store the wrench
Store the tool in a secure place. A torque wrench needs to be handled and stored with precision.
What happens when a torque wrench doesn’t click?
The wrench has a clutch system making clicking noises and slipping at the highest level to keep the torque minimum. The torque wrench clicks are built to accurate torque measurements, but they must be calibrated for optimum accuracy.
If the wrench does not click, it may not provide the correct torque value. It may be due to various factors, such as incorrect calibration or the wrong size wrench for the job. If a torque wrench is correctly working, it will click when the desired torque is reached.
How to Tighten Nuts and Bolts using a torque wrench
Put your socket on the head of your wrench. To use your torque wrench, start by sliding a socket that matches your nut or bolt into the head of your torque wrench. If you have an extender or adaptor that you’re using, you can slide that into the opening at the head instead.
Torque wrenches come in different sizes, but the sockets are almost always interchangeable. Unfortunately, torque wrenches are expensive, so they rarely come in a single size.
Turn the nut or bolt by hand until it catches the threading on the screw. Take the nut or bolt that you’re going to tighten and place it over the threading for the screw or opening on your vehicle by hand. Turn the vehicle’s nut or bolt clockwise with your fingers until the threading catches the threading on the screw. Turn the nut or bolt until it doesn’t turn by hand anymore.
Warning: You should not use a torque wrench to make the threads initially catch. Torque wrenches provide a lot of power, and if your nut or bolt isn’t perfectly aligned with the screw, you could destroy the threading on both of them.
Fit the socket on top of the nut or bolt you’re tightening. With the nut or bolt set on the threading, hold the torque wrench handle in your non-dominant hand. Use your dominant hand to guide the socket, adaptor, or extender onto the nut or bolt. Slide the wrench over the nut or bolt until the two pieces are flush.
Turn the handle clockwise to tighten the nut or bolt. Rotate the handle clockwise to begin tightening the nut or bolt. Almost all torque wrenches have automatic return functions, so you don’t need to reposition them on the nut or bolt. For this type of wrench, move it counter-clockwise to reset it. If you have a manual wrench, reposition it on the nut or bolt to continue torquing it down.
You have an automatically-returning torque wrench if you hear a clicking or switching noise when you return the handle counter-clockwise.
Stop turning the wrench when it starts clicking or stops moving. If your automatic wrench clicks when returning it, keep tightening the nut or bolt. If it starts clicking when you turn it clockwise, stop tightening the nut or bolt. The clicking noise while tightening indicates that you have reached your desired torque level. On a manual wrench, stop turning it when you feel the wrench resisting.
If you have the handle adjusted to 100 ft-lb (1330 m-kg) of torque, the bolt is tightened to that level when it starts clicking when you try to tighten it.
Manual wrenches will stop moving after the nut or bolt has been turned to the intended torque level.
How to Remove Lag Bolts
A lag bolt is used in wood construction to assemble structures such as decking, bridges, and beams. A lag bolt does not have a nut and is a screw. Lag bolts, indeed, are sometimes called lag screws.
The advantage of a lag bolt is the amount of force it can create and the sharp point at its end, making it ideal for connecting wood pieces. The key to loosening a lag bolt is to not crack the wood material around the bolt.
Items Needed
- Open-end wrench or box wrench
- Ratchet
- Screwdriver
Step 1
Inspect the lag bolt head to determine the correct tool to remove it. Some may take an open-end wrench, box wrench, ratchet, or screwdriver. Using the right tool will make the job easier and reduce the chance of damage to the material the bolt is fastened through.
Step 2
Apply the tool to the bolt. First, make sure it is snugly affixed to the bolt. If it is not, you run the risk of stripping the bolt.
Step 3
Turn the bolt counter-clockwise slightly to determine the torque you’ll need to remove the lag bolt. Slowly increase pressure on the wrench or other tool until the bolt begins to turn, rather than suddenly exert great force on the tool, to get an idea of how much force you’ll have to use to turn the bolt out. You do not want to use too much torque, or you may damage the material around the bolt.
Step 4
Continue to turn the bolt to the left (counter-clockwise) until it is out of the material.
Can I tighten bolts without using a torque wrench?
Yes. You can tighten bolts without a torque wrench, but it will be much harder than using a torque wrench.
How to maintain and store a torque wrench
Dial the wrench back to zero when you’re done using it. When you’re done using the wrench, turn both dial settings on the handle back to 0. Leaving the dial turned to a torque setting higher than 0 can throw the calibration off over time.
Turning the wrench to negative numbers is equally as bad for your wrench.
Clean dirty or rusty nuts or bolts before loosening them. One of the easiest ways to damage your wrench is to allow rust and grime buildup inside your sockets. This makes it harder for your torque wrench to get an adequate grip on the socket and can cause many problems. Clean each bolt or nut that you plan on tightening with a towel or rag before attaching your wrench.
Check this too: How To Remove An Overtightened Oil Plug
Torque wrenches aren’t meant to be lubricated. Get any grease or lubricant off your bolt or nut using a degreaser before attaching a socket.
Get your wrench calibrated at least once a year. Unless you have years of experience working on cars, it’s best to have a mechanic or torque wrench specialist calibrate your torque wrench for you. When using your torque wrench, a discrepancy will naturally develop between the measurements on your handle and the actual torque of the wrench. Fix this problem and prevent dangerous scenarios by calibrating your wrench yearly.
Storing your Torque Wrench
Storing a fully loaded torque wrench can result in a set in the spring, weakening the spring over time. But if you completely offload the spring to the zero setting, other components within the wrench may move a little. And in the world of torque, a little is a lot. Reapplying spring compression will shift the orientation of these components, affecting accuracy.
Note: A torque wrench in regular use doesn’t need to be wound back. If you expect to store a torque wrench for more than a few weeks, always wind it down to the lowest scale setting (never to zero).

