How to Read a Vernier Caliper
Are you looking to do a DIY project and need accurate measurements? Then you need to use vernier calipers. Calipers are measuring tools used to precisely determine the width of a gap or object, much more accurately than a tape measure or ruler.
A Vernier caliper is an instrument that measures internal or external dimensions and distances. It allows you to take more precise measurements than regular rulers. Keep reading to learn how to read vernier caliper in cm and inches.
How to Use a Vernier Caliper
Below is a step by step explanation for using Vernier calipers;
Preparing Your Instruments and Tools
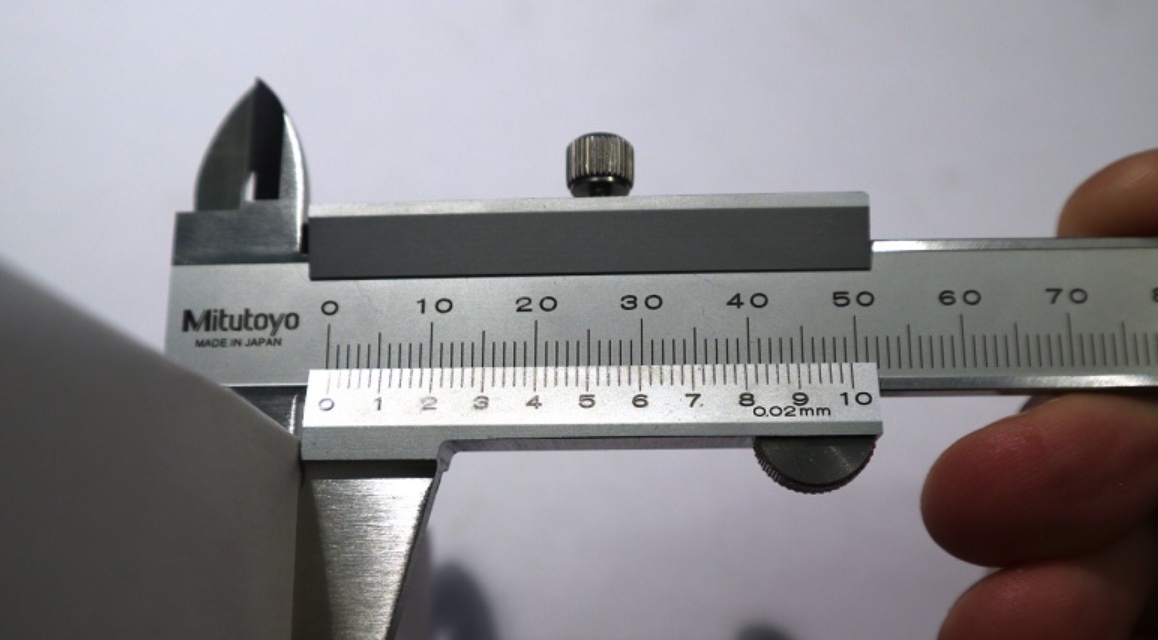
Understand the parts of the Vernier caliper. A Vernier caliper has primary jaws used for measuring the external diameter and smaller jaws used for measuring the internal diameter of objects. Some models also have a depth gauge. The major scale is fixed in place, while the Vernier scale is the name for the sliding scale that opens and closes the jaws.
Read the scales on your Vernier caliper. Each scale of your caliper reads like an ordinary ruler. Typically, a caliper has a major scale marked with numbered inches or centimeters, plus smaller divisions between them. The sliding (Vernier) scale should have an engraved label to tell you what it represents.
Check this too: DeWalt Impact Driver How to & Troubleshooting Guide
If the sliding scale doesn’t have a label, you can assume the numbered divisions represent 1/10 of the smallest division on the main scale. So, for example, if the major scale’s smallest lines represent 0.1 inches, then each numbered division on the Vernier scale represents 0.01 inches.
Check the scale of your smallest divisions. Before measuring, count the number of lines between two numbers on your Vernier scale. Use this to determine how much distance each of the smallest lines represents.
For example, the numbers on a Vernier scale represent 0.1 inches, and there are five unnumbered lines between them. 0.1 inches ÷ five = 0.02 inches, so each of the unnumbered lines represents 0.02 inches.
Clean the object you are measuring. Wipe it off to ensure there’s no grease on it and that there’s nothing in the way that will interfere with an accurate measurement.
Unlock the screw. If your Vernier caliper has a locking screw, loosen it before beginning.
Twisting something to the right (clockwise) will tighten it, while twisting it to the left (counter-clockwise) will loosen it.
Close the jaws. Before measuring anything, close the jaws and faces to zero out the reading to get a precise measurement. If you don’t do this, you won’t start with your scales lined up at zero when you take your measurement, and you will have to correct for the zero error.
For example, if the zero on the sliding scale lines up with 1 mm on the fixed scale, you have a positive zero error of +1 mm. Subtract 1 mm from all measurements to read a vernier caliper in mm.
If the zero on the sliding scale is to the left of the main scale zero, you have a negative zero error. Slide it, so the zeros line up while watching another mark to see the size of the error. For example, if the 0.5mm mark moves from the 1mm mark to about the 2.1 mm position, the zero error is -(2.1 – 1), or -1.1 mm. Add 1.1 mm to all measurements to correct this.
Using the Calipers
Slide one of the jaws against the object. The caliper has two types of jaws. The larger ones tighten around an object to measure its distance. The smaller jaws fit into an opening and can be pushed outward to measure their internal diameter.
You can adjust both pairs of jaws by sliding the smaller scale. Once you’ve got one of the jaws in position, tighten the locking screw if there is one.
Please read the main scale where it lines up with the sliding scale’s zero. The major scale on a Vernier caliper typically tells you the whole number plus the first decimal. Read this as you would a ruler, measuring to the zero mark on the sliding (Vernier) scale.
How to Read a Vernier Caliper
Identify your caliper. Use the instructions for vernier calipers if your tool has two scales, one sliding over the other. See the dial caliper instructions if your tool has one scale and a round dial instead.
If you are using a digital caliper, the measurement should be displayed on an electronic screen, typically with the option to switch between mm (millimeters) and inches (in). Before reading a digital vernier caliper, close the larger jaws completely and press the Zero, Tare or ABS button to set the closed position to a zero value.
Method 1
Check for zero errors. Loosen the screw or screws holding the sliding scale in place. Next, move the sliding scale until the larger jaws of the caliper are fully pressed against each other. Compare the 0 positions on the sliding scale and the fixed scale engraved on the caliper body. If the two 0 marks are lined up exactly, skip ahead to reading the measurement. Otherwise, continue to the next step to correct the error.
Correcting the Zero Error
Use an adjustment wheel if present. While this is not common, some vernier calipers have an adjustment wheel on the sliding scale, which can be pushed to adjust without affecting the caliper jaws. If your model has this wheel, push it until the zeroes on the sliding scale and fixed scale line up, then skip ahead to reading the measurement. Otherwise, continue to the next step.
- Watch the jaws closely to ensure you are not pushing a fine adjustment screw, which opens and closes the jaws in small amounts. Calculate a positive zero error.
- For example, if the sliding scale’s 0 is to the right of the fixed scale’s 0, read the measurement on the fixed scale that lines up with the sliding scale’s 0. This is a positive zero error, so write this down with a + sign.
- For example, if the sliding scale’s 0 is at 0.9mm on the fixed scale, write down “zero error: +0.9 mm.” Calculate a negative zero error. If the sliding scale’s 0 is to the left of the fixed scale’s 0, take the following steps:
- With jaws closed, look for a mark on the sliding scale that lines up exactly with a value on the fixed scale. Move the sliding scale so that mark lines up with the next highest value. Repeat until the sliding scale 0 is to the right of the fixed scale 0. Note the amount of distance moved.
- Read the value on the fixed scale that lines up with the sliding scale’s 0. Subtract the amount of distance moved from the value you just read. Write down this zero error, including the negative sign.
- For example, the seven on the sliding scale lines up with the 5mm mark on the fixed scale. Move the sliding scale until it is further right than the fixed scale, then line up the 7 with the next fixed-scale mark: 7mm. Note that you moved a distance of 7 – 5 = 2mm. The sliding scale’s 0 is now located at the 0.7mm mark. The zero error is equal to 0.7mm – 2mm = -1.3mm.
- Subtract the zero error from all measurements. Any time you take a measurement, subtract your zero error from the result to get the actual dimensions of the object. Don’t forget to take the sign of the zero error (+ or -) into account.
- For example, if your zero error is +0.9mm, and you take a measurement that reads 5.52mm, the actual value is 5.52 – 0.9 = 4.62mm. For example, if your zero error is -1.3mm, and you take a measurement that reads 3.20mm, the actual value is 3.20 – (-1.3) = 3.20 + 1.3 = 4.50mm.
Reading the Measurement
- Adjust the jaws to take a measurement. First, clamp the large, flat jaws around an object to measure an outside dimension. Next, insert the smaller, curved jaws into an object and expand outward to measure the interior dimension. Finally, tighten the locking screw to keep the scale in place.
- Slide the scale to open or close the jaws. If your caliper has a fine adjustment screw, you can use this to make more precise adjustments.
- Read the fixed scale value. Once you have the caliper jaws in the right position, look at the fixed scale engraved onto the body of the caliper. Typically there is an imperial and a metric fixed scale; either one will work. Take these steps to find the first couple digits of your measurement:
- Find the 0 value on the smaller, sliding scale next to the fixed scale you are using. On the fixed scale, find the nearest mark to the left of that 0, or exactly on it.
- Read that mark’s value just like you would read a ruler – but note that the imperial side of a caliper divides each inch into tenths, not sixteenths, as most rulers do.
- Check the sliding scale for additional digits. Examine the sliding scale carefully, starting at the 0 mark and moving right. Stop when you find a mark that aligns with any mark on the fixed scale. Read this value on the sliding scale as you would a regular ruler, using the unit engraved on the sliding scale.
- The value of the fixed-scale mark makes no difference. You only need to read the value on the sliding scale.
- Add the two values together to get your final answer. This should be a simple case of writing the fixed scale digits, then writing the sliding scale digits afterward. Check the unit engraved on each scale to make sure.
- For example, your fixed scale measures 1.3 and is marked “inches.” Your sliding scale measures 4.3 and is marked “0.01 inches,” meaning it represents 0.043 inches. The exact measurement is 1.3 inches + 0.043 inches – 1.343 inches.
Note: If you found a zero error earlier, don’t forget to subtract it from your measurement.
Method 2
- Check for a zero error. Close the jaws completely. If the needle on the dial doesn’t point to zero, rotate the dial manually until the zero is beneath the needle. You may need to loosen a screw at the top or base of the dial face before doing this. If so, remember to tighten the screws again after you’ve adjusted.
- Take the measurement. Close the larger, flat jaws around an object to measure the outside diameter or width. Alternatively, insert the smaller, curved jaws into an object and expand to measure the interior diameter or width.
- Read the scale value. The scale engraved on your caliper can be read just like a regular ruler. First, find the value at the inner edge of your caliper’s jaws. The scale should be labeled with a unit, typically cm (centimeters) or in (inches).
- Note that the inch scale of a caliper is typically an engineer’s scale, with each inch divided into ten parts (0.1) or five parts (0.2). This is different from most rulers, which display sixteenths or eighths of an inch.
- Read the dial value. The needle on the dial points to an additional value for more precise measurement. The units should be labeled on the dial face, typically 0.01 or 0.001 cm or in.
- Add the two values together. Convert both measurements to the same unit, then add them together. You may not need to use the most precise digits for many applications.
- For example, the fixed scale displays 5.5 and is labeled cm. The needle on the dial points to 9.2 and is labeled 0.001 cm, so this represents 0.0092 cm. Add them together to get a measurement of 5.5092 cm. Unless you are working on a project that requires extreme precision, you can probably round this to 5.51 cm.
Notes:
- Consider purchasing a digital caliper if you have trouble reading a vernier or dial caliper.
- Store your calipers with the jaws slightly apart to reduce the risk of errors.
- Periodically remove dust and grime between the jaws by wiping with rubbing alcohol or mineral spirits.
Check this too: How to Clean Concrete Without a Pressure Washer
How to Read a Circular Vernier Scale
On some instruments, the vernier scale is rotational. Follow the same steps to read the rotational vernier scale:
- Read the major scale. Look for the last whole or half mark increment visible before the zero mark on the vernier scale.
- Read the secondary scale (Vernier) measurement. This is the value of the scale that lines up with the center line of the main scale.
- Add the two measurements together.
How to read a vernier caliper with a dial
A Dial caliper is a calibrated precision measuring tool useful for taking accurate measurements. Dial calipers are much more common nowadays than vernier calipers. In addition, the dial indicator’s central feature makes dial calipers much easier to use and read.
To read a dial vernier caliper;
- Close the jaws and check that the indicator points to “0” on the dial face.
- If the caliper doesn’t read zero, loosen the bezel clamp screw and rotate the bezel to the “0” position. Then, tighten the bezel clamp screw to fix the “0” position.
- The major scale on the caliper with the inch system is marked every .100″ and represents one revolution. Each graduation on the dial represents .001″.
- Thus a measurement of .617 inches would be obtained by reading .600 on the major scale and then adding 0.017 as determined by the dial.
- Metric Dial calipers are read similarly.
- The major scale on the caliper has graduations every 1mm (millimeter) and represents one-half of a revolution of the dial. Every 10th mark is numbered in cm (centimeters).
- Each full revolution is 2mm. (It takes five revolutions to make 1cm or 10mm). Each graduation on the dial represents .02mm.
- Thus a measurement of 12.02 mm would be obtained by reading 1 (1cm = 10mm) on the main scale. Add two graduations past the 1 and then add 0.02 as determined by the dial (as shown in the image). 10 + 2 + .02 = 12.02
Note: When using either a metric or inch dial caliper, smaller readings than those graduated may, of course, be obtained by visual interpolation between graduations. Also, ensure you clean the measuring faces before and after measurement.

