How to Program a Jeep to a Garage Door Opener
The ability to drive right into your garage during winter is an underappreciated blessing. Staying toasty after getting out of your car is a necessity during winter. But this is only possible if you program your car to access your garage door opener so you can open it automatically.
Keep reading to learn how to synchronize your Jeep to your garage door opener,
How to program a Jeep garage door opener
Follow the steps below to program your Jeep Wrangler garage door opener settings;
- Park outside of the door you wish to program
- Reset the HomeLink memory system by holding down the two outside buttons until you see the indicator light flash. This will erase all previous data stored in the system]
- Look at your garage door opener to determine what type of opener you have. To do this, look for a LEARN or TRAIN button located next to the motor. If you have one, you’re using a rolling code garage door opener. If you don’t, you’re using an older system
- Once you’ve figured out the type of garage door opener you have, put your car’s ignition switch to the “on/run” position but do not engage the engine
- Hold your handheld transmitter 3-8 centimetres away from the HomeLink system
- At the same time, push and hold the transmitter for your garage door opener and the HomeLink button you want to program
- The HomeLink light will flash rapidly after 30 seconds. This indicates that the connection was successful
- Once you see the flashing light, release both buttons
- You may want to check to make sure that the HomeLink system was programmed by holding down the button to see if the light stays consistent. If it does, the programming was successful.
For newer garage door system;
- Push the LEARN or TRAIN button on the garage door opener
- You now have 30 seconds to get back to the HomeLink system and push the HomeLink button twice
- If the garage opens, you’re all set!
Note: All Jeeps can use the HomeLink system to store data to connect to up to three different garage doors at once.
General HomeLink Training Instructions
Below are some general guidelines to help you connect your Jeep to the Homelink system.
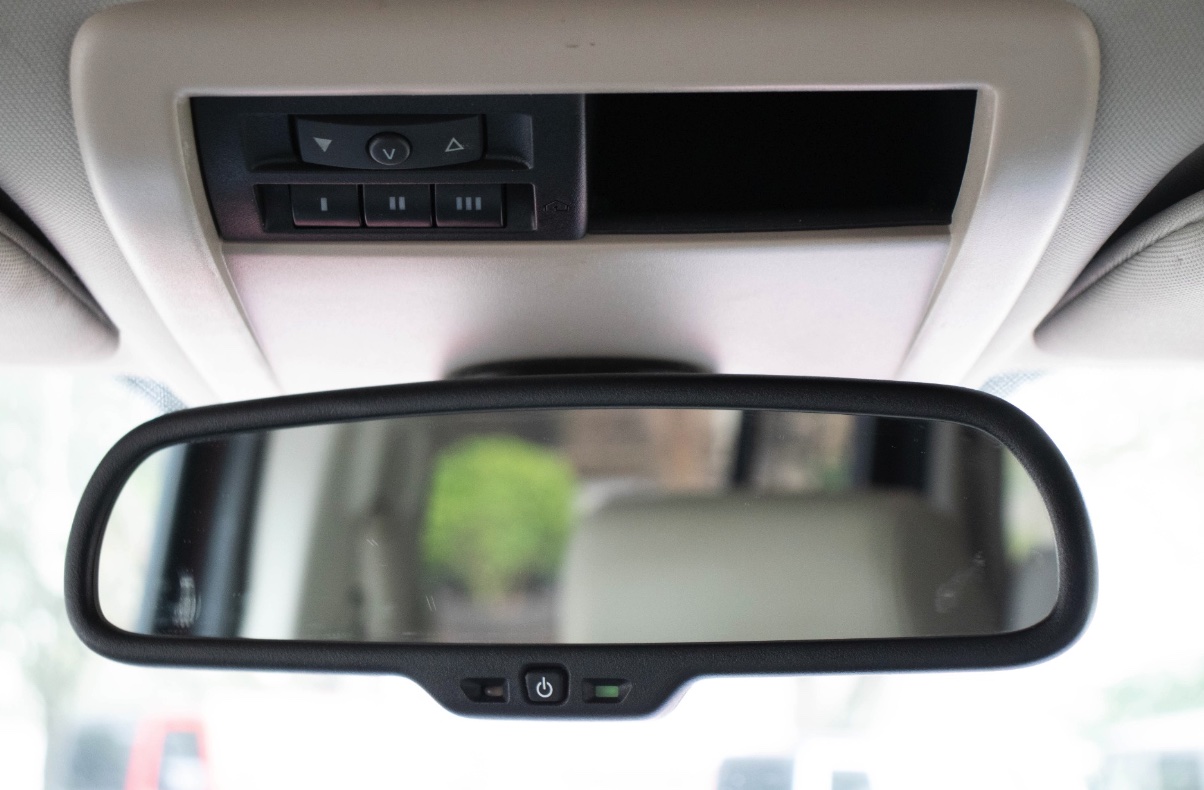
Your HomeLink buttons will typically be located in your vehicle’s mirror, overhead console, or centre stack, but its location varies based on vehicle make, model, and year. If you are unsure where your HomeLink is located, refer to your Jeep’s user manual.
Your owner’s manual should always provide the most accurate training instructions and should be used as your primary reference point for device training. If you cannot find your owner’s manual, the following instructions have been designed to work for training most compatible devices. Please note that these instructions assume a mirror-based HomeLink location. If your HomeLink is located elsewhere in your vehicle, please use that location in place of the mirror.
Note: HomeLink is compatible with hundreds of different garage doors, gates, and other devices worldwide. However, we cannot guarantee compatibility in all geographies and with all device manufacturers.
Before programming HomeLink, make sure that people and objects are out of the way, and park your vehicle outside of the garage.
We recommend getting a new battery for your garage door remote for more accurate programming.
If your garage door opener uses rolling code, you may need a stepladder or other sturdy, safe device to reach the “Learn” or “Smart” button later in the programming.
HomeLink and Garage Door Training:
For your first-time training HomeLink, it may be helpful to clear your HomeLink. To do this, press and hold the outer two HomeLink buttons for 10 seconds. DO NOT release until the indicator light changes from solid to flashing rapidly. Skip this step when training additional buttons.
Holding your garage door remote 1-3 inches (3-7 cm) away from your HomeLink buttons, simultaneously press and hold the HomeLink button you would like to train and the button on your handheld garage door remote. Do not release until the HomeLink indicator light changes from flashing slowly to either solid or flashing rapidly.
Press and release the trained HomeLink button. If you have a fixed code device, your HomeLink indicator light will be solid, and pressing the trained HomeLink button should now activate your garage door.
If your garage door is not functioning, and the indicator light is flashing rapidly, you likely have a rolling code device, and have a few more steps to complete, which we will get to in the next section (“Rolling Code Training”).
Rolling Code Training
The next steps are time sensitive, and may need to be tried multiple times. A second person may make the following steps quicker and easier.
- On your garage door opener in the garage, locate the “learn,” “smart,” or program” button. The shape and color may vary by manufacturer.
- Press the learn, smart, or program button. Depending on the brand of your garage door opener, the indicator light may begin blinking.
- Within 20 seconds, return to your vehicle and press and release the programmed HomeLink button.
- Repeat the “press and release” sequence up to 3 times to complete the training process.
- HomeLink should now activate your rolling code equipped device.
- To train other buttons, skip the “clearing” process at the beginning of this video, and simply follow the other few steps using an un-programmed HomeLink button.
Note: If you are unable to reach the “learn,” “smart,” or “program” button, we recommend using a stepladder or other sturdy, safe device. Do not stand on your vehicle to complete these steps.
Clearing HomeLink settings
Before returning a leased vehicle or selling your vehicle, it is recommended that you clear any programmed HomeLink buttons.
To do this, simply press and hold the outer two HomeLink buttons for 10 seconds, until the HomeLink indicator light changes from solid to blinking.
Reprogramming a Single HomeLink Button
When the following procedure is performed, buttons which already have devices registered to them can be overwritten without clearing other programmed buttons.
Press and hold the desired HomeLink button.
Continue holding the HomeLink button for about 20 seconds, and the HomeLink indicator light will start slowly flashing. While continuing to hold the HomeLink button, position the garage door remote 5-30cm below the HomeLink buttons and press and hold the garage door remote until the HomeLink indicator light changes from slowly flashing to solid or rapidly flashing. This change indicates the frequency signal has been learned.
Press and hold the programmed HomeLink button and observe the indicator light.
If the indicator light is solid, programming is complete, and your device should activate when the HomeLink button is pressed and released.
If the indicator light blinks rapidly, proceed with “Rolling Code Training.”
How to Program a 2022 Jeep Garage Door Opener
One of the many conveniences of the newer Jeep vehicles is the built-in garage door opener or HomeLink system. This system allows you to program your garage door opener into your Jeep so that you never have to worry about losing it again. However, it’s only a convenience once it’s set up. If you purchased a Jeep without the instruction manual or lost the instructions and have a new home or a new garage door opener, follow these simple steps to program your Jeep garage door opener.
Sit in your Jeep with the engine off. Press the first and third buttons on your HomeLink system at the same time and hold them down for 20 seconds. The electronic vehicle information center (EVIC) will display “Clearing Channels.” As soon as the message changes to “Channels Cleared,” release the buttons.
Select one of the three HomeLink buttons to train. Your HomeLink system can hold up to three garage door codes. Hold the garage door remote 1 to 3 inches away from your EVIC, and press the selected HomeLink button and the garage door remote button simultaneously. The EVIC will display “Training.” When the training is successfully completed, the message will change to “Trained,” and you will hear a beep.
To train additional HomeLink buttons to open other garage doors;
Select one of the three HomeLink buttons to train. Your HomeLink system can hold up to three garage door codes. Hold the garage door remote 1 to 3 inches away from your EVIC, and press the selected HomeLink button and the garage door remote button simultaneously. The EVIC will display “Training.” When the training is successfully completed, the message will change to “Trained,” and you will hear a beep.
If your training is unsuccessful, your garage door opener has a rolling code for security and requires additional training steps. Go to the garage door motor and find the “Smart” or “Learn” button, usually located near the antenna. Press the button, and immediately return to your Jeep and press down the HomeLink button that you programmed for two seconds. Release the HomeLink button, and then press it and hold it down for two seconds again and release it. At this point, the HomeLink system may be programmed, but some brands of garage door openers require a third press and release, so press it down a third time for two seconds, and then let it go.
When it comes to programming your Jeep’s garage door opener, you’ll be working with the car’ HomeLink system. Essentially, this is the system that allows you to connect your vehicle to three separate garage doors or gates. When it comes to programming this system, the steps are simple to follow.
Before getting started, look for your car’s HomeLink buttons—these will be on the overhead console or on the driver side sun visor. You’re looking for three buttons labelled with one, two, or three dots.
Here’s what you need to do to program your Jeep’s HomeLink system:
If you bought a used car, start by clearing pre-existing programs from the HomeLink system. Do this by holding down on the first and third HomeLink buttons at the same time. Keep pressing the buttons down for ten seconds.
Figure out the type of garage door opener your house has. To do this, walk into your garage and look for the learn or train button on the garage door opener. If the opener has this button, you’re working with a roller code garage door opener—this type will require some additional steps when programming your HomeLink system. If you can’t find either a learn or train button, then you have a non-roller code opener. Once you go through the main programming process, you’ll be done!
Go back to your car and get in the driver’s seat. Put the ignition into On/Run but make sure you don’t start the engine.
Hold your handheld garage door opener one to three inches away from the HomeLink system. As you do this, simultaneously hold down the HomeLink button you want to program and the button on your handheld opener. Keep pressing down on these buttons until the HomeLink indicator light starts to flash. This light will start flashing slowly at first, then quickly.
Release the buttons when the indicator light starts flashing rapidly.
Test whether you’ve successfully programmed your garage door opener by holding down on the HomeLink button—if the indicator light to see if it stays on continuously as you press down on the button, then you’ve successfully programmed your Jeep’s garage door opener.
At this point, you’ve completed the process if you have a non-rolling code garage door opener!
If you have a rolling code garage door opener, you’ll need to follow some additional steps:
Get out of your car and walk over to your garage’s door opener. Once again, find the “learn” or “train” button. Firmly push and release this button once.
Now, you’ll need to move quickly or have someone help you with this next step. After pushing the “learn” or “train” button, you or your friend will have 30 seconds to return to your car and push the HomeLink button you’re programming. Push this button twice, holding it down for two seconds each time.
If your garage door opens or closes after pushing the button twice, you’re done! If not, hold down on the HomeLink button for two seconds a third time. Now, your rolling code garage door should be fully programmed to your Jeep!
Jeep WJ Grand Cherokee HomeLink Guide
The Grand Cherokee Limited, Overland and selected special models feature HomeLink as standard factory-installed equipment. HomeLink is an optional feature on most Laredo models. The HomeLink transceiver is integral to the Electronic Vehicle Information Center (EVIC), which is located in the overhead console.
The only visible component of the HomeLink system are the three transmitter push buttons centered between the four EVIC push buttons located just rearward of the EVIC display screen in the overhead console. The three HomeLink transmitter push buttons are identified with one, two or three dots so that they be easily identified by sight.
Each of the three transmitter push buttons controls an independent radio transmitter channel. Each of these three channels can be trained to transmit a different radio frequency signal for the remote operation of garage door openers, motorized gate openers, home or office lighting, security systems or just about any other device that can be equipped with a radio receiver in the 288 to 410 MegaHertz (MHz) frequency range for remote operation. The HomeLink feature is capable of operating systems using either rolling code or non-rolling code technology. The EVIC module displays messages and a small house-shaped icon with one, two or three dots corresponding to the three transmitter buttons to indicate the status of each selection.
The EVIC messages are:
- Clearing Channels – Indicates that all of the transmitter codes stored in the HomeLink system are being cleared.
- Cleared Channels – Indicates that all of the transmitter codes stored in the HomeLink system have been successfully cleared.
- Training – Indicates that the HomeLink system is in its transmitter learning mode.
- Trained – Indicates that the HomeLink system has successfully acquired a new transmitter code.
- Did Not Train – Indicates that the HomeLink system failed to acquire a new transmitter code.
- Transmit – Indicates that a trained transmitter button has been depressed and that the HomeLink system is transmitting.
The HomeLink system cannot be repaired, and is available for service only as a unit with the EVIC module. This unit includes the push button switches and the plastic module. If any of these components are faulty or damaged, the complete EVIC module must be replaced.
Setting transmitter codes
It is recommended that a new battery be placed in the hand-held transmitter of the device being programmed to HomeLink for quicker training and accurate transmission of the radio frequency signal.
1. Turn off the engine
2. If the vehicle or module is brand new, the factory test codes must be erased before putting it into the training mode. This step is also taken if you want to change previously set codes, or for security reasons when selling your vehicle. To clear all settings, press the two outside HomeLink buttons (1 and 3) for twenty seconds. Individual channels cannot be erased. Erasing the transmitter codes will erase ALL programmed codes. The message “Clearing Channels” will initially appear on the display, and after 20 seconds will change to “Channels Cleared”. Do not hold the buttons for longer than 30 seconds.
3. Choose one of the three buttons to train. Place the hand-held transmitter within one to three inches away from the lower left corner of the EVIC display and push the buttons on both transmitters. The display will indicate “Training”.
4. When the universal transmitter has completed the training, the “Trained” message will be displayed and an audible beep tone will be sounded. The universal transmitter is now trained. To train the other buttons, repeat Step 3 and Step 4. If your device activates when one of the HomeLink buttons is pressed, programming is complete. Be certain to keep the hand-held transmitter in case you need to retrain the universal transmitter.
If the message “Transmit” appears on the display but your device does not activate, the device may be equipped with a “Rolling Code” system (random digital code signals from the remote transmitter).
Follow these additional steps for programming Rolling Code devices:
5. At the garage door opener receiver (motor unit) locate the “learn” or “smart” button. This can usually be found where the hanging antenna wire is attached to the motor unit. Firmly press and release the button.
6. Within 30 seconds, return to the vehicle and firmly press, hold for two seconds, and release the programmed HomeLink button. Repeat the “press, hold, release” sequence a second time, and depending on the brand of the door opener or other device, repeat the step a third time to complete the programming process.
Erasing transmitter codes
To erase the universal transmitter codes, simply hold down the two outside buttons (1 and 3) for twenty seconds. NOTE: Individual channels cannot be erased. Erasing the transmitter codes will erase ALL programmed codes.
Troubleshooting
Rolling Code Systems: If, after programming the HomeLink wireless control system, the hand-held transmitter and/or other HomeLink units in other vehicles fail to activate the rolling code equipped device, you may need to clear the device’s receiver memory. Refer to your door opener Owner’s Manual for the process. After clearing the receiver, you must reprogram the original hand-held transmitter(s) to the receiver using the procedure in the door opener’s manual. Finally, reprogram the hand-held transmitter(s) to HomeLink using the steps above.
Check the frequency of the garage door opener’s hand-held remote(usually found on the back). HomeLink is compatible with radio-frequency devices operating between 288-399 MHz.
Put a brand new, store bought battery in the hand held remote. During the programming process the battery’s energy tends to drain (more so with an older battery). A new battery will increase the speed and accuracy in which the hand-held remote sends its signal to HomeLink.
Retrain HomeLink holding the hand-held remote at different lengths and angles from the HomeLink button you are trying to program. Try 4-6 inches away at a different angle.
Cycle the hand-held remote during programming: Press and hold the HomeLink button while you press and release the hand-held remote every 2 seconds until the indicator light changes from a slow blink to a rapid flash.
To verify HomeLink has programmed to a non-rolling code (“fixed”) garage door opener, press and hold the HomeLink button. If the indicator light remains solid, it has picked up the signal and should operate the door. If it remains a slow blink, HomeLink has not picked up the signal from the hand-held remote. Try programming the button again or chose another button to program.
To verify HomeLink has picked up a rolling code signal: press and hold the programmed HomeLink button. If the indicator light blinks rapidly for two seconds and turns solid, HomeLink has successfully picked up the rolling code signal.
Range troubleshooting tips:
Poor range can be caused by interference around or near the vehicle or due to the use of older batteries in the original transmitter during programming.
Put a new battery in your hand-held remote. Training the HomeLink takes more power from the battery than when you push the button to open the door. Sometimes by putting a new battery in the hand-held remote, it does help pick up a better train and increases the range.
Retrain the HomeLink at different lengths and angles. Start by holding the hand-held transmitter 3-4 inches away then 5-6, even 6-8 inches from the buttons. Sometimes this helps pick up a better train to HomeLink.
Try a second remote with new batteries.
Straighten the antenna wire that hangs down from the garage door opener motorhead.
Jeep Commander HomeLink Guide
The HomeLink Universal Transceiver replaces up to three remote controls (hand held transmitters) that operate devices such as garage door openers, motorized gates, or home lighting. It triggers these devices at the push of a button. The Universal Transceiver operates off your vehicle’s battery and charging system; no batteries are needed.
In the 2005 Grand Cherokee, the HomeLink buttons are located in the overhead console. The console also contains two reading lamps, storage for sunglasses and optional power sunroof switches. The Vehicle information center, formerly located in the overhead console, is now located within the instrument cluster. HomeLink comes Standard on Limited models and is optional on the Laredo.
Note: The HomeLink Universal Transceiver is disabled when the Vehicle Theft Alarm is active.
Programming HomeLink
Note: When programming a garage door opener, it is advised to park outside the garage. It is also recommended that a new battery be placed in the hand-held transmitter of the device being programmed to HomeLink for quicker training and accurate transmission of the radio-frequency signal. The Electronic Vehicle Information Center (EVIC) features a driver-interactive display which includes HomeLink system messages. The EVIC is located on the bottom of the tachometer.
SAFETY WARNING!
Vehicle exhaust contains carbon monoxide, a dangerous gas. Do not run the vehicle’s exhaust while training the transceiver. Exhaust gas can cause serious injury or death.
Your motorized door or gate will open and close while you are training the Universal Transceiver. Do not train the transceiver if people or pets are in the path of the door or gate. A moving door or gate can cause serious injury or death to people and pets or damage to objects.
A moving garage door can cause injury to people and pets in the path of the door. People or pets could be seriously or fatally injured. Only use this transceiver with a garage door opener that has a “stop and reverse” feature as required by federal safety standards. This includes most garage door opener models manufactured after 1982. Do not use a garage door opener without these safety features it could cause injury or death.
1. Press and hold the two outer HomeLink buttons, and release only when the EVIC display shows “CHANNELS CLEARED” (after 20 seconds). Do not hold the buttons for longer than 30 seconds and do not repeat step one to program a second and/or third hand-held transmitter to the remaining two HomeLink buttons.
2. Position the end of your hand-held transmitter 1-3 inches (3-8 cm) away from the HomeLink buttons.
3. Simultaneously press and hold both the HomeLink button that you want to train and the hand-held transmitter buttons. Do not release the buttons until step 4 has been completed.
Note: Some gate operators and garage door openers may require you to replace this Programming Step 3 with procedures noted in the “Canadian Programming” section below.
4. The EVIC display will show “CHANNEL X TRAINING” (where X is Channel 1, 2, or 3). Release both buttons after the EVIC display shows “CHANNEL X TRAINED.”
Note: If the EVIC display shows “DID NOT TRAIN” repeat steps 2-4.
5. Press and hold the just trained HomeLink button and observe the EVIC display. If the EVIC display shows “CHANNEL X TRANSMIT” (where X is Channel 1, 2, or 3), programming is complete and your device should activate when the HomeLink button is pressed and released.
Note: To program the remaining two HomeLink but-tons, begin with “Programming” step two. Do not repeat step one.
Note: If your hand-held transmitter appears to pro-gram the universal transceiver, but your garage door does not operate using the transmitter and your garage door opener was manufactured after 1995, your garage door opener may have a multiple security code system (rolling code system). Please proceed to steps 6—8 to complete the programming of a rolling code equipped device (most common garage door openers require this step.
6. At the garage door opener receiver (motor-head unit) in the garage, locate the “learn” or “smart” button. This can usually be found where the hanging antenna wire is attached to the motor-head unit.
7. Firmly press and release the “learn” or “smart” button. (The name and color of the button may vary by manufacturer.)
Note: There are 30 seconds in which to initiate step eight.
8. Return to the vehicle and firmly press, hold for two seconds and release the programmed HomeLink button. Repeat the “press/hold/release” sequence a second time, and, depending on the brand of the garage door opener (or other rolling code equipped device), repeat this sequence a third time to complete the programming. HomeLink should now activate your rolling code equipped device.
Note: To program the remaining two HomeLink buttons, begin with “Programming” step two. Do not repeat step one.
Note: If programming a garage door opener or gate operator, it is advised to unplug the device during the “cycling” process to prevent possible overheating.
Using HomeLink
To operate, simply press and release the programmed HomeLink button. Activation will now occur for the trained device (i.e., garage door opener, gate operator, security system, entry door lock, home/office lighting, etc.). For convenience, the hand-held transmitter of the device may also be used at any time.
Erasing HomeLink Buttons
To erase programming from the three buttons (individual buttons cannot be erased but can be “reprogrammed” – note below), follow the step noted:
Press and hold the two outer HomeLink buttons and release only when the EVIC display shows “CHANNELS CLEARED” (after 20 seconds). Release both buttons. Do not hold for longer that 30 seconds. HomeLink is now in the train (or learning) mode and can be programmed at any time beginning with “Programming” – Step 2.
Reprogramming a Single HomeLink Button
To program a device to HomeLink using a HomeLink button previously trained, follow these steps:
1. Press and hold the desired HomeLink button. Do not release the button.
2. The EVIC display will show “CHANNEL X TRANSMIT” (where X is Channel 1, 2, or 3) for 20 seconds and then change to “CHANNEL X TRAINING.” Without releasing the HomeLink button, proceed with “Programming” Step 2.
Security
If you sell your vehicle, be sure to erase the frequencies by following the “Erasing HomeLink Buttons” instructions in this section.
This device complies with part 15 of FCC rules and with RSS-210 of Industry Canada. Operation is subject to the following conditions:
This device may not cause harmful interference.
This device must accept any interference that may be received including interference that may cause undesired operation.
Note: Changes or modifications not expressly approved by the party responsible for compliance could void the user’s authority to operate the equipment.
How to program Jeep garage door opener without remote
To link your 2022 Jeep Compass to your garage door opener without a remote, follow these steps;
Step 1. Choose your choice of controller
Locate the small control box that is built-in in your car. It resembles the primary control box of your garage door opener. It is usually found by the rear-view mirror or in front of the driver’s seat. It has four arrows and a LED indicator either in the middle of the arrows or on the side.
Step 2. Study the control panel
For better navigation, match the positions of the arrows, how the LED indicator works, and how to operate the control box. Studying the control panel and what each button or arrow would do is easier if you have your car’s user manual.
Step 3. Start programming
Locate the ‘learn’ or ‘program’ button in your garage door opener. It is at the back of the unit and comes in yellow, red, orange or purple color. Press the learn button simultaneously with the arrows in your small control box.
Press the buttons firmly and hold them down for at least 3 seconds to erase all pre-programed settings. The LED indicator should light up steadily for a few seconds before going dark. When the light is gone, that is how you know that all settings are flushed.
Step 4. Restore default settings
Go back to your garage door opener and key in the default code. The keypad will light up once the code is set. Start pressing the arrows in your car if the garage door responds.
You can also test it by parking your car away from the garage door, say by a few meters away. As you pull up by the driveway, press the up arrow of your car and see if the garage door responds.
If it does, take note of the time it takes before the garage door opens so that you would know when to press it by the driveway when you arrive. If the programming worked, you would need an extra layer of security, so you have to set a new code.

