LiftMaster Garage Door Opener How-to & Troubleshooting Guide
LiftMaster garage door openers are renowned and trusted by many homeowners, but it doesn’t change the fact that their openers develop issues occasionally and require troubleshooting. As a garage door opener, you need to know the signs of problems and basic troubleshooting and repair skills.
Most repairs are quite easily like resetting the opener, adjusting the safety sensors, and replacing damaged wires. You should also know some maintenance practices like lubricating the door tracks to ensure the opener works efficiently for longer. Below we have compiled some of the most asked questions by LiftMaster garage door opener users and the possible solutions to get your opener working correctly.
How to reset a LiftMaster garage door opener
Resetting the garage door opener will erase all programmed remote controls, wall consoles, and keypads. It also helps when the opener is glitching. Follow the instructions below on how to reset the LiftMaster garage door opener.
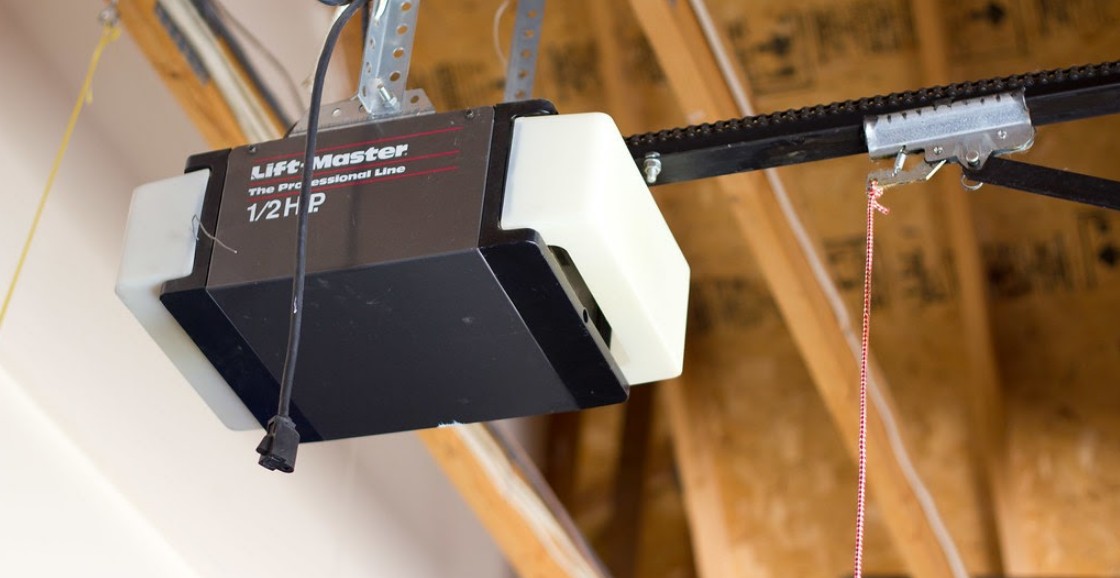
- Place a ladder beneath the opener’s motor unit.
- Open the panel covering the unit’s controls by firmly pulling it down until it swings open. The panel location may differ depending on the model of the opener.
- Locate the Learn button on the control panel. It may be a yellow round button or a square purple button.
- Press and hold the Learn button for about six seconds. The LED light above it will turn. Hold the button down until the light goes out and release it. All remote controls and keypads are clear from the motor’s memory.
- Press and hold the Learn button again for about six seconds to erase all the linked myQ devices.
How do I reset my LiftMaster garage door sensor?
Resetting the garage door sensors ensures they are aligned. The garage door will not close if the sensors are not installed or are out of alignment. To reset the sensors;
- Loosen the wing nuts hold the sensor brackets in place, and reposition the sensor. If alignment is correct, the LED lights on the sensors should glow steadily.
- Tighten the wingnuts to keep the sensors well positioned.
- To test if the reset was correct, place a carton box on the doorway and press the remote control button. The garage door should not move more than an inch, and the opener lights will flash ten times. If the door moves, it should reverse when it makes contact with the carton.
How to program a LiftMaster garage door opener to a car
Depending on your car’s make, year, and model, you can program its HomeLink control panel to the garage door opener remote control to allow you to operate the garage door from the vehicle. You have to connect the HomeLink system to your remote control and pair it with the opener’s motor. Follow the instructions below on how to pair the garage door opener to your car.
- Turn your car on and put it in parking mode.
- Locate the HomeLink control panel in your car. It is usually by the rear-view mirror or in front of the driver’s seat. It has four arrow buttons, and an indicator LED light.
- Press and hold the two exterior buttons simultaneously for about 10 seconds. When the LED light flashes and then goes off, release the buttons.
- Choose the button on the HomeLink control panel you want to operate the garage door opener.
- Hold the remote control close to the control panel. Press and hold the remote control button and then press and hold the chosen button on the car.
- The LED light in the car will flash slowly and then steadily. Release both buttons when the light flashes steadily and the light will go off.
Why is my LiftMaster garage door opener keypad not working?
The keypad adds security since only people will the code can access the garage. If you enter the correct code and the garage door opener does not work, here are the ways you can troubleshoot the issue.
1. Dead batteries.
Check the batteries of your garage door opener keypad. If you haven’t changed the batteries in a while, they may be dead. Open the battery compartment, remove the old batteries, insert the new batteries making sure the positive(+) terminal on the battery is in contact with the negative(-) keypad terminal.
2. Damaged wires
Check the keypad for any damaged wires. Weather conditions can damage electrical wires preventing the keypad from sending signals to the opener. Open the back cover of the keypad; if the wires are detached, reconnect them. If the wires are damaged, you have to replace them or replace the whole keypad.
3. Stuck or malfunctioning keys.
If there is dirt and grime stuck around the keypad buttons, it may be preventing the buttons from depressing properly. Spray some appliance cleaner around the keypad and scrub gently using a dry toothbrush to loosen all the dirt between the buttons. Wipe the exterior with a clean, dry cloth.
Inspect the condition of the keypad. Rain, snow, spills, extreme temperatures, and basic wear can cause the keypad’s logic board to malfunction. If the damage is too much for repairs, get a keypad replacement.
4. Faulty code
If the keypad is working, check for an error code. When you enter the PIN repeatedly over a short period, the keypad will trigger an overload protector that locks the keypad. You have to reprogram the keypad to the opener again.
The LiftMaster remote control is not working.
Every once in a while, the LiftMaster garage door opener will stop responding to the remote control. Here are some of the reasons and possible solutions to the problem.
1. The garage door opener is on lock mode.
The remote control cannot operate the opener if lock mode is active, but the keyless entry can give you access to the garage door. When the opener is locked, the LED light on the keyless entry will be flashing. To deactivate lock mode, press and hold the lock button for about two seconds, and the LED light on the keyless entry will stop flashing.
2. Discharged batteries
The most common reason your garage door opener remote control is not working is the batteries are dead. If it has been a while since you replaced them, you should consider replacing them. The type of battery you use is equally important. Using rechargeable batteries can cause your remote to work intermittently since they do not put out much power. To reduce damaging the remote control, only use the 3V CR2032 coin cell batteries.
3. Dirty battery contacts
The battery contacts inside the battery compartment transmit power from the battery to the remote control. Over time the contacts degrade and develop rust which makes it challenging to connect the power. Inspect the contacts and look for dirt or rust. To remove this, you need to scrub the surface with a dry clean cloth and polish them with fine-grit sandpaper or steel wool.
4. Reset the remote control
Sometimes, the remote control will lose frequency, or the frequency will be interrupted by another device in the garage, preventing the opener from receiving its signal. Reset the remote control from the opener and reprogram it.
Why is my LiftMaster garage door opener not opening all the way?
When the garage door opener is stuck and won’t open all the way, you can troubleshoot it in various ways, depending on what is causing the issue. Here are the possible reasons and solutions for a garage door opener that won’t open.
1. Broken springs
Check the garage door springs and make sure they are not loose or broken. The garage door springs usually act as a counterweight to the door to keep the garage door balanced and stable when moving during the open and closing cycle.
With a broken spring, the garage door has nothing to support its weight when it moves. So if you notice the door leaning low on one side, there is likely a broken spring. A broken spring will affect other parts of the garage door, and it is dangerous to open a garage door with broken springs. Contact a professional garage door technician to replace the springs and fix the affected parts like the pulleys and cables.
2. Binding garage door
Check the garage door for any signs of binding. Binding usually happens when the trim board is too close to the garage door. When the garage door is binding, the opener motor will not have enough strength to push it all the way open. The easiest way to fix this is to chisel off the excess wood until it is flush with the framing board.
3. Power source problems
Check the opener’s power outlet. Test the power outlet to ensure it is working correctly by unplugging the opener and connecting another device; if it powers up, that means the outlet is working fine. Inspect the cable plugs and make sure they are not bent. Look for loose connections on the terminals, check for broken or damaged cables and replace if necessary.
4. Safety sensor problems
The LiftMaster garage door opener, like other openers, has safety reversing sensors that detect motion or objects around the garage door and reverse the garage door. Whether the door is open or closed, it won’t operate if the sensors are not well installed. Check the receiving sensor(green light) and make sure it is not under direct sunlight. Check the wiring and make sure it is correct. Connect the white wires to the white terminal and the black wires to the gray terminal on the motor unit. Align the sensors and make sure both LED lights are glowing steadily. If both LEDs are off, the sensor or the opener is not powered.
5. Track problems
The garage door tracks are prone to bending due to the weight of the mechanism, repetitive use, and inadequate maintenance, preventing the garage door from moving. Check and mark any dents, unplug the opener, loosen the bolts holding the tracks in place, and gently hit the dented areas with a rubber mallet to straighten them.
LiftMaster garage door opener keypad not responding consistently
When your garage door opener keypad works sporadically, which means it doesn’t work all the time, the reasons could be a wiring issue or radio signal interference. Here is how to fix this problem.
1. Radiofrequency interference
The most likely reason that can cause your keypad to work intermittently is usually signal disruption. Another electronic device that uses radio signals can disrupt the signal between the keypad and opener like security lights, microwave, or a remote-controlled car. The best way to fix this is to locate the device causing radio interference and remove it from the garage.
2. Frayed wires
Check the keypad’s wiring. Open the back of the keypad and check for frayed wires or loose connections, which call the keypad not work all the time. Reconnect any loose wire connections securely using electrical tape or replace the wires.
3. Loose batteries
If you recently replaced the keypad batteries, it will not work consistently if the batteries are not well situated in the compartment and touching the terminals correctly. Open the battery compartment and insert the batteries correctly.
Why is the light blinking on my LiftMaster garage door opener?
Typically the light feature on the LiftMaster garage door opener flashes ten times when something obstructs the safety sensor bean or when the sensors detect motion around the garage door. However, there are times when the opener light will flash even if the garage doorway is clear. The light feature is one of the garage door opener’s diagnostic tools. Here is how to troubleshoot the issue following the steps below.
- Access the control panel on the motor unit and locate the Learn button and the Learn LED light. Count the number of times the Learn LED light flashes before it takes a long pause and begins flashing again.
- If the LED light flashes once and pauses, it indicates a safety sensor wiring problem. Follow the wires that run from the safety sensors to the motor unit. Inspect the stapled areas and check if some of the staples have broken through the wires. Remove the staples that may have gone through the sensors’ wires with a pair of pliers and cover the damaged parts with electrical tape.
- If the LED light blinks twice, it means the black and white wire connections at the terminals are in reverse, or there is a wire with low voltage. Connect the two white wires with a plastic wire connector and plug it into the white terminal. Bind the black wires using the plastic wires connector and plug it into the gray terminal on the motor unit. If the wire connection is correct and the problems persist, there is a short wire that needs replacing.
- If the light blinks three times, the wiring to the wall control is probably damaged, or the wall control is not working. Inspect the wiring and look for any damages, especially around the staples and replace the wires. To check if the wall control is functioning, remove the wall control from the wall using a screwdriver, loosen the terminal screws at the back of the wall control, touch the wires together and if the garage door moves, replace the wall control.
- If the light is blinking four times, the sensors are either misaligned or obstructed. Clean the sensor with a lint-free cloth. To align them, loosen the wires holding the brackets, align the sensor, make sure both LED lights on the sensors are growing steadily, and tighten the bracket nuts.
- If the light blinks five or six times, this indicates malfunctioning sensors or logic board in the motor. Contact a technician to diagnose and replace the devices.
LiftMaster garage door opener flash codes, meanings & fixes
The LiftMaster garage door opener has self-diagnostic capabilities that flash error codes to help you identify and fix an issue. The chart below explains the flash codes on the up and down arrow buttons on the control panel of the motor unit, their meanings, and solutions.
| Up arrow button | Down arrow button | Symptom | Solution |
| 1 | 1 | The garage door opener does not close, and the light bulb is flashing. | Safety sensors have been installed, connected to the motor, or the connecting wires are short or damaged. Check the wiring and replace any broken wires. |
| 1 | 2 | The garage door opener will not close, and the light bulb will continue flashing. | The safety sensor wires are either short or reversed. Check the wiring at all staple points and connection points for damages and replace the wires if necessary. If the wires are in reverse, disconnect them and reconnect them properly. White wires connect to the white terminal, while the black wires connect to the gray terminal. |
| 1 | 3 | The garage door will not operate | The wall control wires are short, or the wall control has malfunctioned. Inspect the wiring and replace it if necessary. |
| 1 | 4 | The garage door does not close, and the light bulb flashes. | Safety sensors are out of alignment or are blocked. Realign the sensors and clean the lenses to remove dirt. Make sure there are no objects around the garage doorway. |
| 1 | 5 | The door closes 6-8 inches and reverses.The door does not close, but the motor clicks.The motor hums for 1-2 seconds and does not move. | Manually open and close the door. Check for binding or obstructions, like a broken spring or door lock, and correct as needed. Check the wiring connections at the travel module and the logic board. Replace the travel module if necessary. |
| 1 | 6 | The garage door hangs after the closing cycle. | Adjust the down and up travel limits.Check the door’s balance and readjust using a technician’s help. |
| 2 | 1-5 | No movement or sound. | Check the power source and circuit breaker. Replace the power socket if needed or turn on the circuit breaker.Replace the logic board in the motor. |
| 3 | 2 | Unable to set the travel or retain the position. | Check the travel module for proper assembly and replace it if necessary. |
| 4 | 1-4 | The door stops when closing and then reverses. | Manually open and close the door. Check for binding or obstructions, like a broken spring or door lock, and correct as needed. If the door is not binding, reprogram the travel limits and force control. |
| 4 | 5 | The garage door moves 6-8 inches, stops, and reverses. | Check the wiring to the travel module. Reconnect the wires or replace the travel module if necessary. |
| 4 | 6 | The garage door does not close, and the light bulb flashes. | Safety sensors are misaligned or obstructed. Realign the sensors and make sure the LED light is glowing steadily. Clean the sensors and make sure nothing is blocking the sensors’ infrared beam. |
The LiftMaster garage door opener has no power.
Follow the troubleshooting steps to help figure out why the LiftMaster garage door opener has no power.
- Ensure the power cord plugs in, and there is power at the electrical outlet. To verify, test if the opener lights and diagnostic lights are working. If they are, that means the opener has power.
- Plug another device that can connect to the 120VAC outlet and ensure the outlet is receiving power.
- If there is power in the outlet and the opener is not working, the logic board is probably defective and requires replacing.
- If there is no power in the outlet, check the circuit breaker has not tripped. If it has tripped, turn it on or contact a professional technician.
The LiftMaster garage door beeps and their meaning
Here are the possible reasons why your LiftMaster garage door opener is making a beeping or clicking sound.
Timer features
The LiftMaster garage door opener 881LMW and 880LMW models on sectional doors have the timer-to-close feature that closes the garage door after a specified period. When the timer feature is about to close the door, the opener beeps, and the opener lights flash to alert you.
Wi-Fi connection
If your garage door opener connects to Wi-Fi using the MyQ technology, then the opener will beep under these circumstances;
- One beep: The opener first connects to Wi-Fi successfully.
- One continuous beep: The opener is trying to connect to the router.
- Two beeps: The opener is trying to connect to the MyQ server.
- Three beeps: The opener connects to the network.
- Three fast beeps: Erasing the Wi-Fi settings from the opener was successful.
- Six fast beeps: The opener has failed to connect to the server.
Backup battery
The garage door openers with Wi-Fi connections also have a backup battery that powers the opener when there is no AC power. Here are the circumstances when a garage door opener has a backup battery beeps;
Beeps every 2 seconds
- The opener is currently on battery mode, and the battery LED light will turn orange.
- If there is power in the house, but the opener is on battery mode, test the AC power outlet and replace it if necessary.
Beeps every 30 seconds
- The battery status light will flash orange to indicate the backup battery is running low on charge and needs charging or replacing the battery.
- If the battery LED light is solid red, the battery is dead and cannot recharge. Replace the battery.
If you want to stop the beeping when changing the battery, unplug the unit and disconnect the battery, plug the unit back to power, and the beeping will stop.
Check this too: Chamberlain Garage Door Opener How-to & Troubleshooting Guide
The LiftMaster garage door opener yellow light blinking
The yellow command and red serve LED lights will flash back and forth when the garage door opener is due for service, usually after approximately 4500 opener cycles. The maintenance alert system helps the garage door to work efficiently by reminding the user of maintenance practices. For proper maintenance, it is best to get a professional technician.
Conclusion
With this article, hopefully, you will be able to fix the most uncomplicated problems with your garage door opener. In case of any complex issues that involve the garage door mechanisms or electrical powers, it is best to contact a professional technician to do the job or invest in a new opener.


My Liftmaster does not beep, I has never beeped, but has a solid red light. Would I still need to replace the battery? I’ve never used the WiFi on it.