Garage Door Maintenance and Upkeep 101: The Ultimate Guide
Taking good care of your garage door will help ensure it works effectively and lasts for longer. For tips on how to take proper care of your door, as well as troubleshooting and how-to steps to follow, here is a comprehensive guide you can use.
How to Align Garage Door Sensors
Garage door sensors protect your family, pets and other things by preventing the heavy garage door from closing if there is anything in the glide path. They work using an electric eye sensor that crosses the doorway. If the sensor does not receive the beam emitted by its opposite number, the door won’t close. Thus, for proper functionality, the sensors need to be aligned and if not, the door won’t close.
Luckily, realigning the sensors and putting things back to working order is not difficult. Here, we will show you how to align garage door sensors. Follow the instructions below:
- Turn off the power to your sensors by tripping the fuse for your garage.
- Loosen the screws that mount each of your garage door sensors. Don’t take them all the way out.
- Slide each garage door sensor downward so it is as low as possible without unscrewing the mounting brackets.
- Tie a string to one sensor so that, if pulled across the garage doorway, it will run across the center of the sensor.
- Run the string across the garage doorway and tie to the opposite sensor. Position the knot so that the string runs across the center of that sensor, too.
- Check that of the string is level. Use a level. If the string line is not level, adjust one or both sensors by sliding the mounting bracket upward. Continue until the sensors are once again level.
- Tighten the screws to secure the sensors in their new position.
- Confirm that the string is level before finishing. The sensors can come out of alignment when tightening the screws.
- Lastly, remove the string and turn the power to your garage back on.
How to Lubricate a Garage Door
A noisy door is a sign that your garage door is not greased enough, which could lead to more serious damage later on. Luckily, through proper maintenance and lubrication, you can prevent the noise and extend the lifespan of your garage door.
Before lubricating, start by cleaning the tracks. Follow these instructions below:
- Close the garage door using the remote or manually. This will allow you to access the tracks and the rest of the moving parts on your door.
- Disconnect your garage door from the power source after you close it.
- Clean out the tracks with a damp rag. The tracks are what the garage door rollers ride on to open and close. Wipe down the inside of both tracks and remove any dirt or debris. Use an automotive brake cleaner to loosen and wash away grime.
- Use a vacuum with a hose extension to suck out dirt and debris that is proving difficult to reach or get out.
- Open your door and spray a lithium-based or silicone-based lubricant on each of the hinges. Spray each hinge as it meets the bend of the track. Your hinges should be covered in lubricant.
- Lubricate the rollers. These are the circular moving pieces on your garage door and are attached to each of your hinges. Use the thin hose attachment to spray the grease inside the rollers where there are small ball bearings. Wipe out any excess lubricant so your door does not become unbalanced.
- Spray the outside of your springs and bearing plates. Usually the springs are located at the top of the garage door and must be fully lubricates as well. The bearing plates are the moving circular parts on both sides of the springs. Spray down the outside of the springs and near the center of the bearing plates, the open and close the garage door to spread the grease around.
- Spray the lock and armbar. Point the lubricant towards the lock’s keyhole and spray it once to lubricate. Once you are done lubricating the lock, finish lubricating your garage door by spraying grease on the large armbar at the top of the door.
- Lubricate the top of the rail. The rail is where the chain rides on and should run along your garage’s ceiling. The top portion of the rail is what you chain actually rides along, so it is the part that needs to be lubricated. Spray the lubricant down the top of rail and use a rag to spread the grease around.
You should lubricate all springs, hinges, bearings, and metal rollers twice a year with a Lithium or Silicone-based spray. Do not use WD-40.
Check this too: Marantec Garage Door Openers Troubleshooting & How-to Guide
How to Replace Garage Door Springs
To replace extension-type garage door springs:
- Purchase a pair of replacement springs that match the specifications of the old springs.
- Next, prepare the garage door. Open the garage door fully and secure C-clamps to both garage door tracks to prevent the door from accidentally shutting while you are working. Additionally, you should unplug the garage door opener so that it cannot be accidentally activated while you are working.
- Unbolt the first extension spring from the bracket that holds it to the back of the door track.
- Disconnect the lift cable from the bracket where it connects to the door rail, just above the door opening. Disconnect the moveable pulley from the end of the spring, and unthread the loose cable from the pulley.
- Disconnect the safety cable that runs through the spring. The extension spring is not free for removal.
- Repeat steps 3-5 for the other door spring.
- Then, start installation by threading the new safety cable through the spring and attaching the ends of the safety cable to the track brackets.
- Attach lift cable. Attach one end of the new spring to its connection point on the door track and the other end to the moveable pulley. Ensure the cable is threaded from the bracket on the lower corner of the door, up over the stationary pulley, looped through the moveable pulley at the end of the spring, then back to the bracket on the door track. Apply a bit of force when making the final attachment of the cable to the track bracket to stretch the spring by a small amount (not more than 1-2 inches). Repeat steps 7 and 8 for the other door spring.
- Apply some garage door spray lubricant to the springs. Plug back in the garage door opener, remove the C-clamps, and test the operation of the garage door. Some lift power adjustment may be necessary as the new springs may be more powerful than the old ones.
To replace torsion-type garage door springs:
- Start by preparing the garage door. Lock the garage door in the closed position by attaching C-clamps inside the tracks, adjacent to the lowest wheels on the door tracks. Disconnect the garage door opener. Position a step ladder so that you are standing slightly off to the side when working with the winding cones on the spring.
- Check the size of the winding bars against the openings in the winding cones on the ends of the torsion springs. Most bars have 1/2-inch and 7/16-inch ends that will fit most torsion springs.
- Insert the end of the winding bar into the bottom lug fitting on the winding cone, ensuring it is fully seated in the opening. Tightly hold the bar as you loosen the two setscrews on the winding cone. Make sure to grip tighly, because as the setscrews loosen, a notable amount of force will be released. Alternate the winding bars into different holds on the winding cone, unwinding the springs gradually until there is no tension left.
- Once all force is released, disconnect the torsion springs from the center mounting bracket by unbolting them using an adjustable or open-end wrench. Slide the springs slightly down the torsion bars towards the end.
- Disconnect the lift cables. Hold the torsion bar in place in the center bracket using a pair of locking pliers to prevent it from falling out. Detach the lift cables from the door brackets at the bottom of the door. Loosen the setscrews holding cable drums to the ends of the torsion bar. Slide the cable drums off the ends of the torsion bar, the slide the old springs off the torsion bar.
- Inspect the cables; if the show wear signs, now is a good time to replace them as well.
- Slide the new springs onto the torsion bar, ensuring the right hand and left hand springs are on the correct sides. Bolt the stationary mounting cones of the springs onto the center mounting bracket, the same way the old springs were attached.
- Reattach the lift cables to the brackets at the bottom of the door.
- “Load” the sprinfs. Using two winding bars, begin twisting the winding cone and torsion spring to “load” it. Follow manufacturer’s instructions for the number of twists required.
- Anchor the springs
- Finish the installation by applying a garage door spray lubricant to the springs. Remove all clamps, plug in the garage door opener and operate the door several times to check its operation.
How to Reset a Garage Door Opener
Resetting erases all remote controls, keyless entries, and MyQ devices from the garage door opener. To reset a Chamberlain garage door opener:
- Press and hold the LEARN button on the opener for about 6 seconds until the learn LED goes out.
- Immediately press and hold the LEARN button again until the learn LED goes out.
- All codes are now reset.
To reset the connection from garage door opener to home Wi-Fi network:
- Press and hold the black adjustment button on the opener for about 6 seconds until you hear 3 beeps.
To erase a MyQ account:
- Go to www.mychamberlain.com to access your MyQ account.
- Go to ACCOUNT section.
- Click DELETE ACCOUNT.
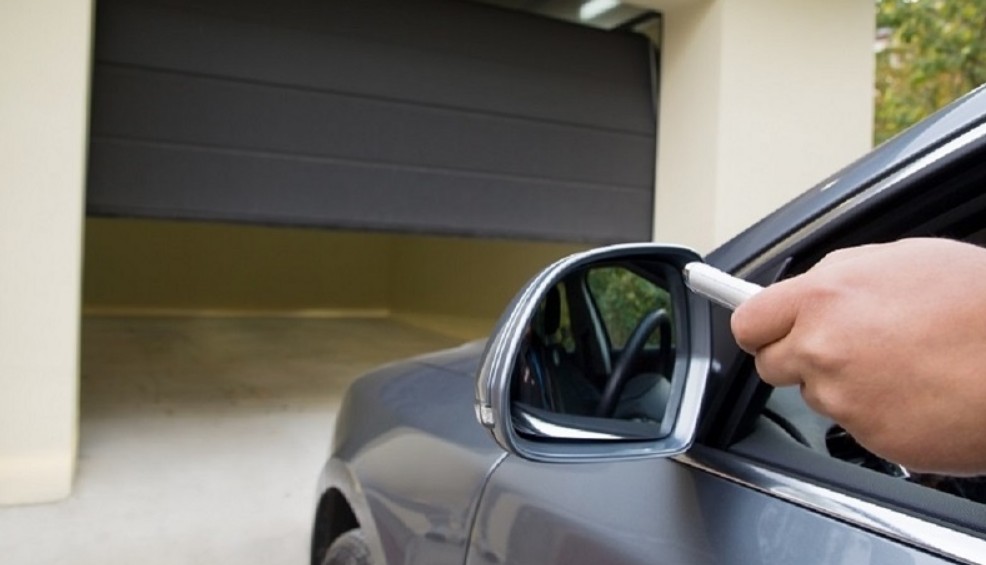
How to Program a Garage Door Opener to a Car
You can program a garage door opener to a car with HomeLink and Car2U wireless control. Depending on the car model you have, you may need a compatibility bridge for the opener to properly operate.
Chamberlain garage door opener
Follow these steps to program the Chamberlain garage door opener to your car’s HomeLink system.
- Press and hold the two outer HomeLink buttons, releasing only when the HomeLink indicator light begins to flash after 20 seconds.
- Position the hand-held transmitter 1-3 inches away from the HomeLink surface, keeping the HomeLink indicator light in view.
- Using both hands, simultaneously press and hold both the desired HomeLink button and hand-held transmitter button. Do not release until the HomeLink indicator light flashes slowly and then fast. Release both buttons when indicator light flashes fast.
- Press and hold the trained HomeLink button and observe indicator light. If the indicator light is solid/continuous, programming is complete and your device should activate when HomeLink button is pressed and released. If the indicator light blinks rapidly for 2 seconds and then turns a solid/continuous light, proceed to the next step.
- At the motor head, locate the Learn or Smart button. Press and release this button. You have 30 seconds in which to initiate the next step.
- Return to your vehicle and firmly press and hold the trained HomeLink button for 2 seconds and release. Repeat the sequence up to 3 times to complete the training process.
Car2U system is not compatible with Chamberlain without a Car2U bridge.
Genie garage door opener
Genie garage door openers are compatible with HomeLink and Car2U wireless control systems which you can program to activate your opener. Follow the steps below to program your garage door opener to a car using these systems:
Programming HomeLink System
Step 1: Clear HomeLink
- Press and hold down the first and third buttons until the indicator on the HomeLink blinks slow and then fast for 20 seconds then release both buttons.
Step 2: Train HomeLink to the Genie Remote
- Choose the button on the HomeLink that will be used to open the door.
- Hold down the Genie remote button. While holding, press and hold the chosen HomeLink button.
- Hold down both buttons until HomeLink indicator blinks slow then fast. Release both buttons once it blinks.
Step 3: Program HomeLink to the Genie Opener
- Place the opener into programming mode by pressing and holding the PROGRAM button on the opener until the round LED turns blue, then release the button. The round LED will go out and the long LED will start flashing purple.
- Press the chosen HomeLink button for 2 seconds and release. Press that same button again for 2 seconds and release. Long LED will flash blue and then turn off.
- Press the HomeLink button a few more times until the door moves.
Programming Car2U System
Step 1: Clear Car2U to default settings
- Press and hold buttons 1 and 3 for 20 seconds or until all three LEDs start to flash.
- Release both buttons. The Car2U system is now set to factory default settings.
Step2: Program Car2U to the Genie Opener
- Place the opener into programming mode by pressing and holding the PROGRAM button on the opener until the round LED turns blue, then release the button. The round LED will go out and the long LED will start flashing purple.
- Press the designated Genie Car2U button for 2 seconds and release. Press that same button again for two seconds and release. The long LED will flash blue and then turn off.
- Press the Car2U button a few more times until the door moves.
How to Program a Garage Door Remote
You may need to know how to program your garage door remote if you change it, it breaks or gets lost or stolen. When choosing a remote, match it to your garage door opener by using the same manufacturer. Another option is to go for a universal remote.
Chamberlain garage door opener
For a Chamberlain garage door, programming can be done through the door control or the learn button on the garage door opener.
To program a using door control:
- Press the navigation button below MENU to view the Features menu.
- Use the navigation buttons to scroll to PROGRAM.
- Select REMOTE to program from the program menu.
- Press the button on the remote control that you wish to operate your garage door.
- The garage door opener lights will flash (or hear two clicks) when the code has been programmed.
To program using Chamberlain garage door opener LEARN button:
- Locate the LEARN button on the garage door opener.
- Press and immediately release the Learn button. The Learn LED will glow steadily.
- Within 30 seconds, press the button on the remote control you wish to operate your garage door.
- The garage door opener lights will flash or two clicks will be heard. The remote control is programmed.
To program using Chamberlain door control LEARN button:
- Locate the Learn button on the door control.
- Press the Learn button twice. The LED will blink.
- Press and release the button on the remote that you wish to operate your garage door.
- The garage door opener lights will flash or two clicks will be heard. The remote control is programmed.
Genie garage door opener
To program Genie garage door remote controls;
- Remove the battery’s protective film from the remote by pulling straight down.
- Press and hold the SET/PRGM button on the opener for 2 seconds. The round LED will turn blue. The long LED will then flash purple.
- Standing at least 5 feet away from the opener, slowly press and release the desired button on the remote two times. Both opener LEDs will flash and turn off confirming the remote has been programmed.
- The opener should now run when you press the desired button again.
- To program the same remote for other openers, repeat the above steps using one of the other remaining remote buttons.
Programming multiple garage door openers using a universal remote
You can program each of the three buttons of the universal remote to open a different garage door. If you have two different garage door openers models installed, make sure the remote is compatible with both of them.
- Use the remote’s visor clip to press and release the recessed button on the back of the remote.
- Press and release the learn button on your first garage door opener motor unit.
- Choose a remote button and hold it down until the opener lights blink.
- Press a different button on the remote to complete programming.
- Release button and try again if lights don’t blink after a few seconds.
- Repeat the process to program the next button for your other garage door opener.
How to Replace a Garage Door Seal
The seal at the bottom of the garage door is the one that experiences the most wear and tear. Rain, heat, snow, or ice can cause the rubber to deteriorate over time. When that happens, you may need to replace your garage door seal lest the contents of your garage become vulnerable too.
To replace a garage door bottom seal, follow this guide:
Tools and materials needed;
- New door seal
- Flathead screwdriver
- Philips head screwdriver
- Measuring tape
- Sweeping brush
- Silicone spray, wax candle or bar of soap
- Utility knife
- An assistant
- Buy the correct door seal for the job. For bottom seal replacement, measure the width and thickness of the door. If you need to replace the seal all the way round, measure the height as well.
- Take a close look at the end of the seal and if you find screws holding the existing door seal in place, use the appropriate screwdriver to remove them.
- Remove the old door seal.
- After removing the old seal, clean out any remnants that are sticking to the door. If removing the seal left some nail holes, fill these in with wood filler.
- Consider purchasing an aluminum track if you don’t have one, and cut it to the width of your garage door. Then cut notches to fit around the rollers at the side of the door. On the leading edge of the door, place a thick dollop of caulk. Then attach the track setup. You are now ready to install your new seal without nails.
- Prepare your work station and make sure the door is at a comfortable height to work at.
- Begin to secure your new seal. If you have a track, there are two grooves running along it. These are where the t-shaped sections of the rubber seal will go. Lubricate the end of the track, using silicone spray or by rubbing the track with a wax of candle or bar of soap, to help feed through the rubber seal.
- Now feed the seal width-ways so that you can insert the two t-shaped pieces into the end of the track. Fold the seal end you are feeding in with one hand and use your other hand to hold the rest of the seal level. If it hangs down, it will pull on the section you feeding onto the track.
- When the front edge is too far along the door for you to keep holding onto the unthreaded portion, get your assistant to now come in. Let your friend hold the portion of the seal that has not been threaded into the track. They should hold it level with the track and folded width-ways.
- When the seal is all the way across your door, add a screw at either end to keep it secure. Then, using a utility knife, trim off any extra rubber. Trim it flush with the edge of the door or flush with the side of the opening, whichever you prefer.
- If your seal is not lying completely flat all along the width opening, you can buy foam rope. This comes in different sizes and can be threaded along inside the bottom seal to make the seal more rigid and ensure that it does not crease.
How to Replace Garage Door Rollers
To replace garage door rollers, you will need the following things:
- Ladder
- Pliers
- Flathead screwdriver
- Garage door rollers
- Clamp
- Claw hammer
With the above tools and supplies, you are ready to proceed. Follow these steps below:
- Open your garage door completely. Lift the garage door open by hand or use the power opener if you have one.
- Disconnect the power opener from your garage door if you have one. If the power opener is hard-wired into your garage, then turn off the breakers or fuses that lead to it.
- Pry open the track near the front of your garage with pliers. Alternatively, you can pry using the back side of a claw hammer. Only pry the track on one side of your garage at a time so you have more control. Prying both sides at once can cause the garage door to fall out of the track.
- Then, pull the garage door down so the roller lines up with the track you pried open. Have a helper hold the door for you so you don’t have to support its weight while working on the rollers.
- Pop the first roller out of the track using a flathead screwdriver. Slide the end of a flathead screwdriver underneath the round part of the roller and then pull the screwdriver handle up to pry out the roller.
- Slide out the old roller and put the new roller in its place.
- Lift the garage door so the roller and the length of track you bent are lined up again. Make sure the roller is in the center of the track. You may need to hit the end of the roller in the hinge with a hammer to push it hack into place.
- Replace all except the top rollers on the side you are working on. Pull the garage door down until you reach the next roller. Pry the roller out of the track with your screwdriver to replace it with a new one. Keep working until you have one roller left on the top panel of your garage door. Open the garage door all the way when you are finished.
- Once you have finished the rollers on one side of the garage, close the section of the track you bent earlier using your pliers. Bend it back to its original position so the track is flush at the seam or else the rollers will catch on it.
- Repeat the process with the rollers on the other side. Continue working on the rollers one at time until you have replaced all but the top two rollers.
- Next is changing the top roller. When the door is open, place a clamp on the track 1 ft from the bottom of your door. This will help prevent the garage door from falling down while replacing the roller on top. If you don’t have a clamp, ask a helper to support the door.
- Pop the roller out of the track with a screwdriver. Use a ladder to climb to easily access the top roller while your garage door is open.
- Pull on the round end of the roller to pull it out from the top bracket. Once removed, slide the new roller in to replace it.
- Turn the track with your hand to pop the roller back in. If the track doesn’t easily turn, the bend the track with your pliers as you did with the other rollers.
- Repeat the process on the other side of the door.
Why Won’t My Garage Door Close?
If your garage door won’t close, it could be of the angle of the sun shining on the sensor. The garage door sensors have a broader light spectrum than infrared, and the light that comes from the sun completely blocks the receiver from capturing the infrared light from the sender.
Check this too: Sideways Garage Doors & Opener: Is it Any Better?
To fix this issue, try replacing it with a high-quality sensor.
How to Manually Open a Garage Door
All electronic and automatic garage doors have a bypass that will allow you to open it manually. You will need to open a garage door manually when there is a power failure or, for some reason, you lose your remote. The bypass disconnects the door from the powered carriage, but it stays on the track.
- Place a ladder under the chain that operates the garage door. Locate a red cord hanging from a bracket on the chain. If there is only one cord, and it is not red, it is probably the right one. The cord will have a plastic red knob on the end.
- Jerk on the cord using the knob. The cord is hooked onto a small level. You will feel that the lever is spring-loaded; pull the cord until the lever locks in the down position.
- Step down the ladder. Grab the door with both hands and lift it. If the door will not budge, pull the cord harder until it locks open. Get a helper if the door is proving too heavy for you to lift.
- Do not let go of the door once it is off the ground. It is free on the track and it will fall if you let go. Prop the door open using a two-by-four or have an assistant hold the door open for you while you drive your car in and out. When you are finished with the door, ease it down by hand.
- Pull down on the cord hard to lock it again after the power comes back on or you find your garage door remote.
- Try the remote, if the door won’t open, but the chain is moving, pull on the chain again until the bracket locks.
What Size Torsion Spring Do I Need for My Garage Door?
Garage door torsion springs are not one-size-fits-all products. You need to choose the correct spring size to accommodate the weight of your garage door.
There are several factors to consider when choosing spring size:
- Inside diameter- This measurement will ensure the spring fits in the space and can produce a sufficient amount of torque. The inside diameter is often indicated on the stationary cone located between the two strings above the door. Check to see a letter or couple of letters followed by a number. If you see P-200 stamped on the cone, it means it is a two-inch inside diameter. Alternatively, it may simply be stamped on there in inches, such as 1 3/4″.
- Wire size- To determine the thickness of the wire, lay your broken spring out in front of you and count out 20 coils, measuring with your tape measure the distance those 20 coils take. Then take the distance and divide it by 20, and this is the diameter of your wire.
- Overall length- The total length of a torsion spring from end to end determines its winding capacity. You will need to do your measurement when there is no tension on the spring. You will also need both sides of a broken spring, if your spring snapped. Measure the length of spring using a tape measure, or measure each half and add together.
How to Change the Battery in a Garage Door Opener
If the remote control’s battery is low, the LED will not flash when the button is pressed. You’ll need to replace it. Follow these steps to replace the battery with your remote control:
- Pry open the case first on the middle, then at each side with a visor clip.
- Remove the old battery from the compartment.
- Insert the replacement battery (3V CR2032), making sure the positive side (+) is up.
How Long Do Garage Door Openers Last
On average, a garage door should last about 10-15 years. It may last longer or shorter depending on the quality of the opener, how often you use the garage, and how well you maintain it.
One of the factors that determine the life expectancy if the garage door opener is type of opener you have. Though each type has its advantages and disadvantages, the belt drive door opener has proven to be more durable than a screw or chain drive.
The crucial thing to do to extend the lifespan of the garage door opener is performing regular maintenance.
Garage Door Only Closes When Holding Button Fix
If your garage door only closes when holding button, it is likely because your sensors are out of alignment. You are bypassing the safety by holding the button down.
To fix this problem, check to see if the light on each sensor is on and then realign from there.
How to Clean a Garage Door
Keeping your garage door clean makes your house look nicer, but that is not all. It has other benefits such as prolonging your door’s finish, increasing your curb appeal, preventing rust, and maintaining your warranty among other things.
Before you start cleaning your garage door, make sure you have the following things:
- A mild detergent, such as dishwashing soap or car-washing soap.
- Non-abrasive sponges and clean cloths.
- Step ladder
Then follow these tips to clean your garage door:
- Wash the door surfaces and windows of your garage with a mild liquid soap and water. Wash both the interior and exterior using a sponge, cloth and/or soft brush.
- Don’t use harsh or abrasive detergents. These can damage the painted surface of the door or the seals.
- Rinse thoroughly with a hose, but do not use a pressure washer as this too can cause damage to the surface.
- If you come across a stubborn stain, such as oil stains, you can spot clean the area with diluted bleach and water solution. Don’t mix bleach with other cleanser because the mixture may cause harmful fumes. Once through with spot cleaning, rinse all surfaces thoroughly.
- After washing, and every 6 months to protect the door’s finish, your door should be waxed. Use a good quality car wax, following the instructions on the package. Do not apply wax to AccuFinishTM, ArmorFinishTM or anodized aluminum doors.
- Also inspect and clean the weather strip at the bottom of the door. Apply a vinyl protector to prolong its life.
- Last but not least, clean and organize the area around the garage door. Remove objects or stacks that could fall over and damage the track or obstruct the path of the garage door.
How to Maintain a Garage Door
The following are some of the tips on maintaining your garage door to help make it last longer, while working effectively:
- Inspect springs and hardware for signs of wear. Avoid any contact with the torsion springs as they are under extreme tension.
- Clean your metal garage door regularly using a mild detergent and a soft brush. This will remove any corrosive chemicals or dirt on the garage door that may prevent it working in top condition.
- Paint wooden garage doors every few years and clean regularly.
- Lubricate the tracks and hinges with Silicone or Teflon-based spray. Then open and close the door to distribute the lubricant. Lubricate moving parts yearly.
- Tighten any loose screws or nuts. Be cautions around any nuts or bolts with “Red” heads. These are under extreme tension.

